
Table of Contents
- Reports Overview
- Filter Reports
- Filter Multiple Users at Once
- Understand Report Details
- Take Action on a Website
- Reclassify a Website
- View Local Reclassifications
- Remove a Local Reclassification
- Add a Website to an Allow List
- Add a Website to a Blocked List
- Download Reports
- Save Reports
- Schedule Email Reports
- Common Troubleshooting Scenarios
Audience: Administrators
Reports Overview
The Reports tab displays detailed browsing activity across your organization, including both allowed and blocked websites.
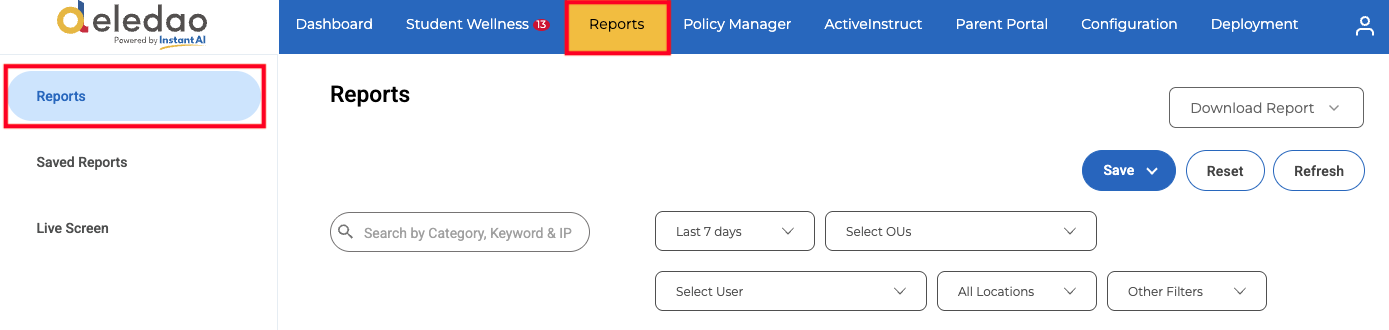
Reports can help answer questions such as:
- Why was a website blocked?
- Why was a website allowed?
- Which category was assigned to a website?
- Was the activity on campus or off campus?
- Which user visited the site?
- Which policy or rule was applied?
- How long was the site visited?
Administrators can also launch Live Screen Monitoring directly from Reports to view active student screens.
Filter Reports
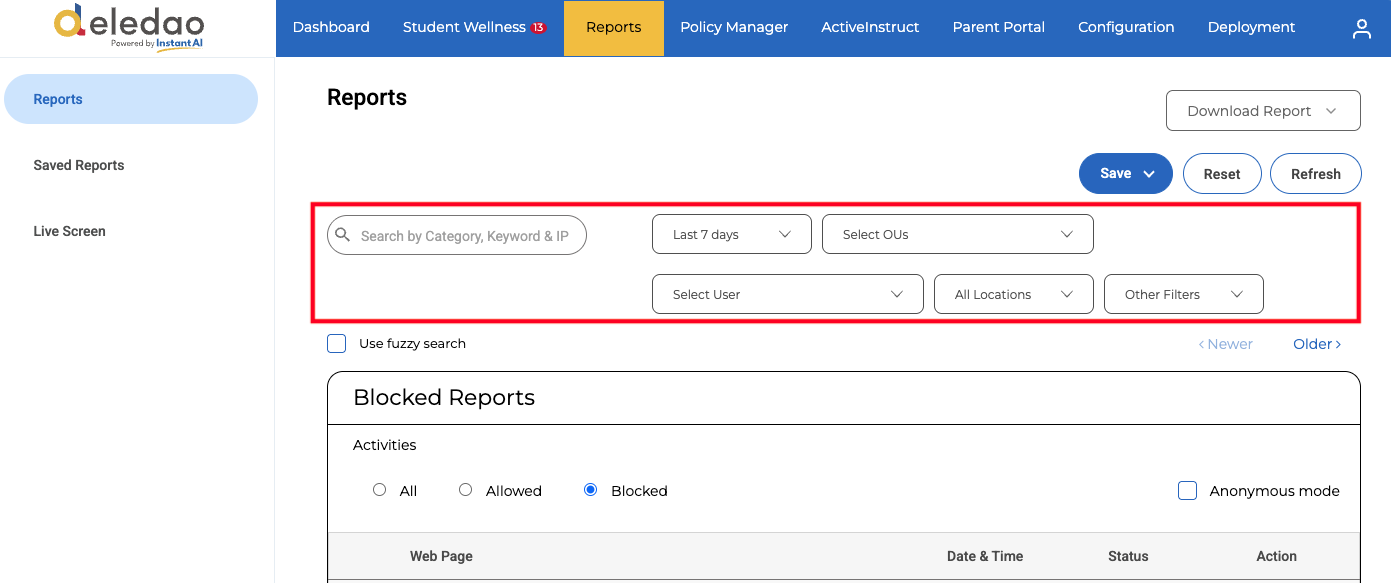
Filters allow administrators to narrow large amounts of data and quickly identify relevant activity.
Available Filters
Reports can be filtered by:
- Category
- Keyword
- Timeframe
- Organizational Unit (OU)
- User ID
- Location
- Blurred Images or Videos
Timeframe Options
Choose from:
- Last 24 Hours
- Last 7 Days
- Last 30 Days
- This Month
- Previous Month
- Custom Range
Location Filters
Filter user activity by:
- On Campus
- Off Campus
This can help determine whether a filtering issue occurred while a student was connected to the school network or from another location.
Filter Multiple Users at Once
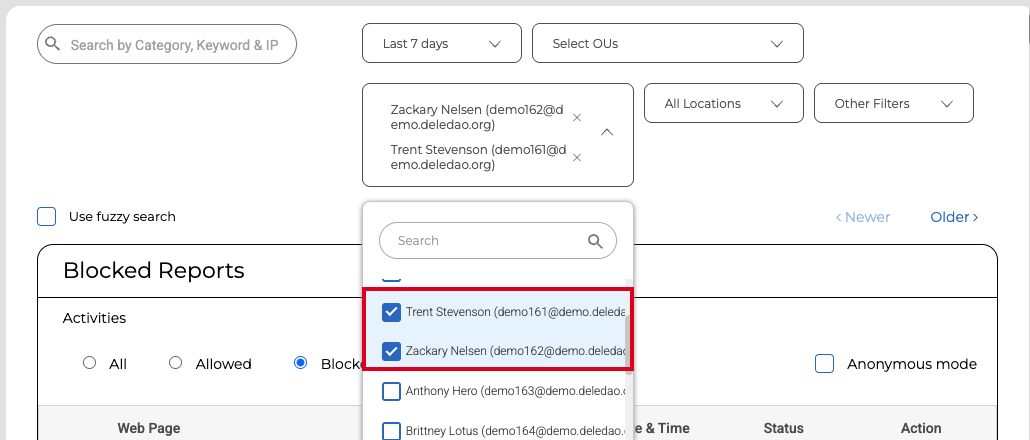
When reviewing activity, administrators can quickly focus on multiple users without manually entering search criteria.
Apply a User Filter
- Locate the users you want to investigate.
- Select the checkbox next to one or more students.
- Apply the desired filter or reporting action.
This allows administrators to generate reports and review activity for multiple users simultaneously, making it easier to investigate grade-level, classroom, or group-wide filtering issues.
Understand Report Details
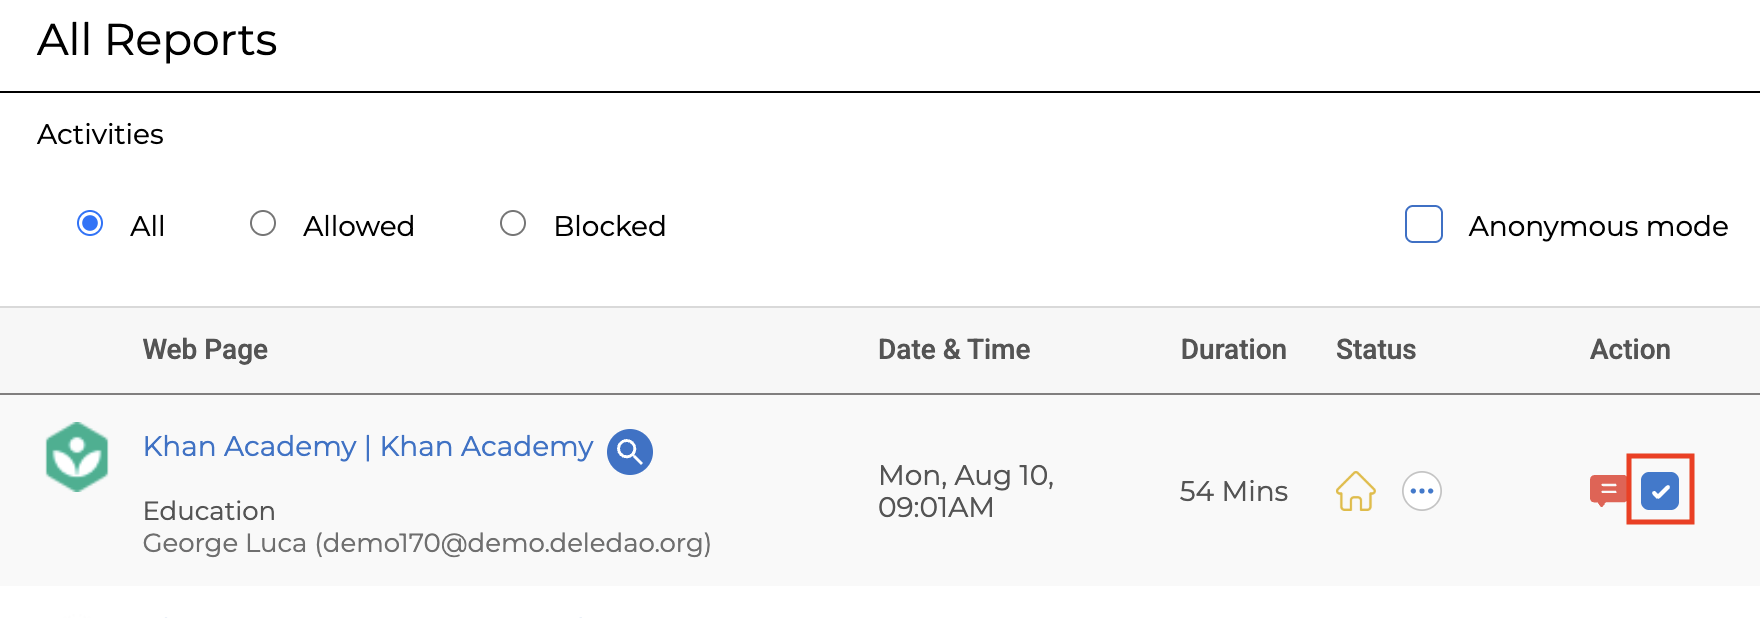
Each report record contains information about a specific browsing event.
Web Page
The Web Page column displays:
- Website name
- Website category
- User information
Clicking the website name opens the site in a new browser tab.

Date & Time
Displays the date and time the activity occurred.
Duration
Shows how long the user spent on the webpage.

Status
The Status column provides additional information about the browsing activity.
Possible indicators include:
- Images Blurred – Indicates image filtering was applied.
- House Icon – Indicates the activity occurred off campus.
- Ad Blocked – Indicates there were ads blocked on the webpage.

- Details Menu– Displays:
- Rule Name
- Policy Version
- Organizational Unit (OU)
- Public IP Address
These details can be useful when troubleshooting filtering decisions.
Take Action on a Website
The Action column allows administrators to make changes directly from the Reports page.
Available actions include:
- Reclassify
- Add to Allowed List
- Add to Blocked List
Reclassify a Website
If a website appears to be categorized incorrectly, administrators can use the Reclassify feature directly from Reports.
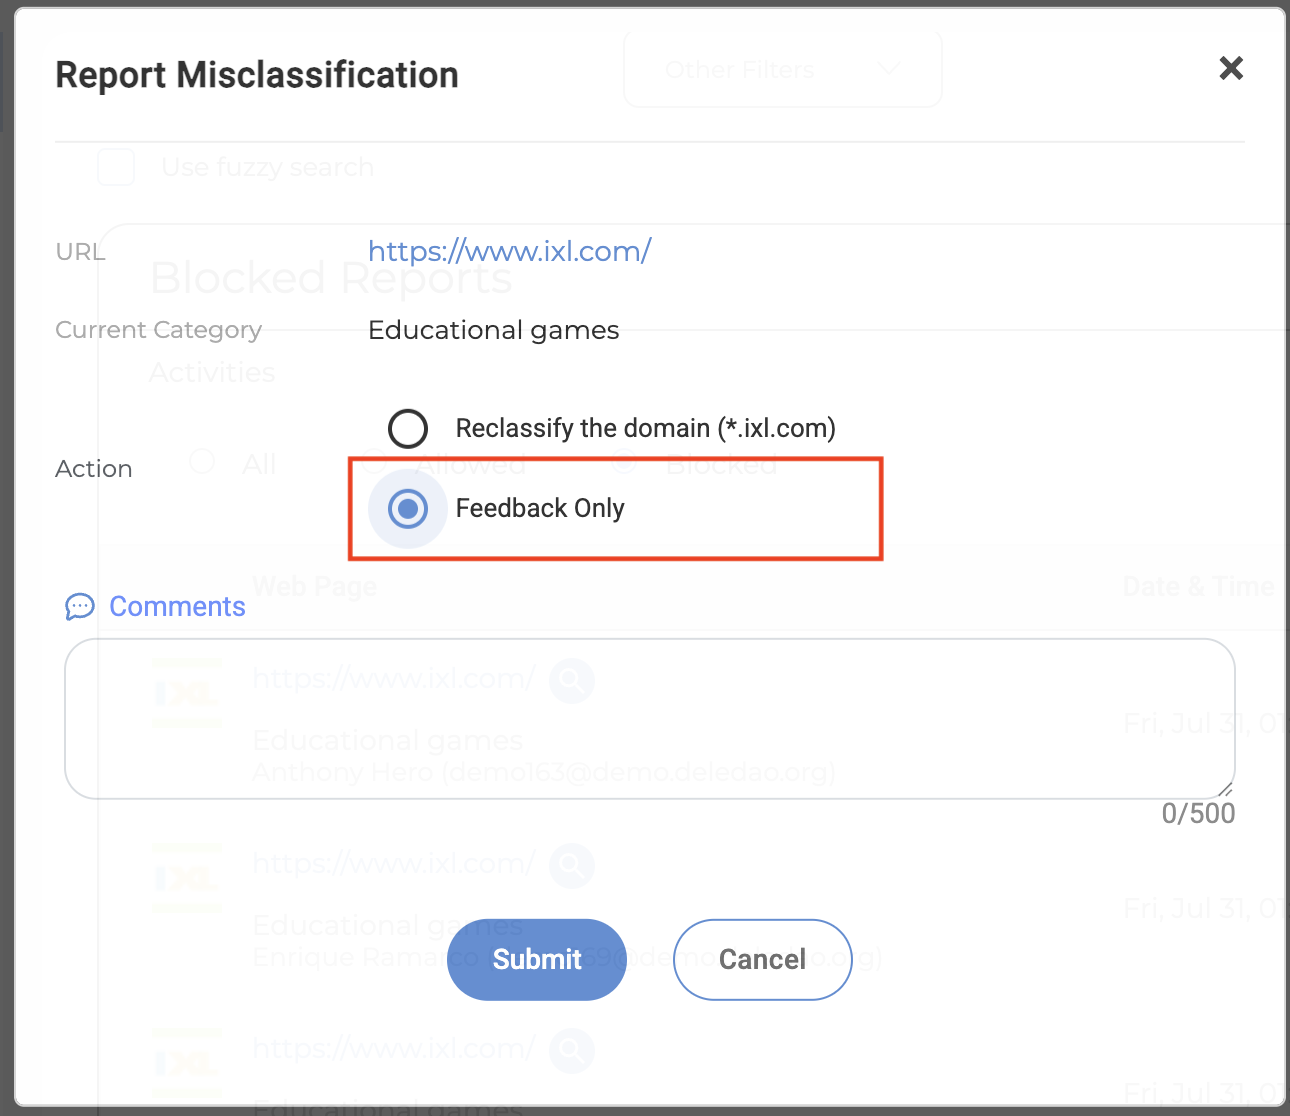
When selecting Reclassify, two options are available:
Feedback Only
Selecting Feedback Only submits the categorization suggestion to Deledao's development team but does not change filtering behavior within your district.
Use this option when you want to suggest a category review without applying a local override.
Reclassify Domain
Selecting Reclassify Domain will:
- Immediately apply a local category override for your district.
- Update filtering behavior right away.
- Automatically submit the reclassification request to Deledao's development team for review.
This allows administrators to resolve categorization issues immediately without waiting for a global category update.
Note: Local reclassifications are district-specific. The change only affects your organization and does not impact other Deledao customers.
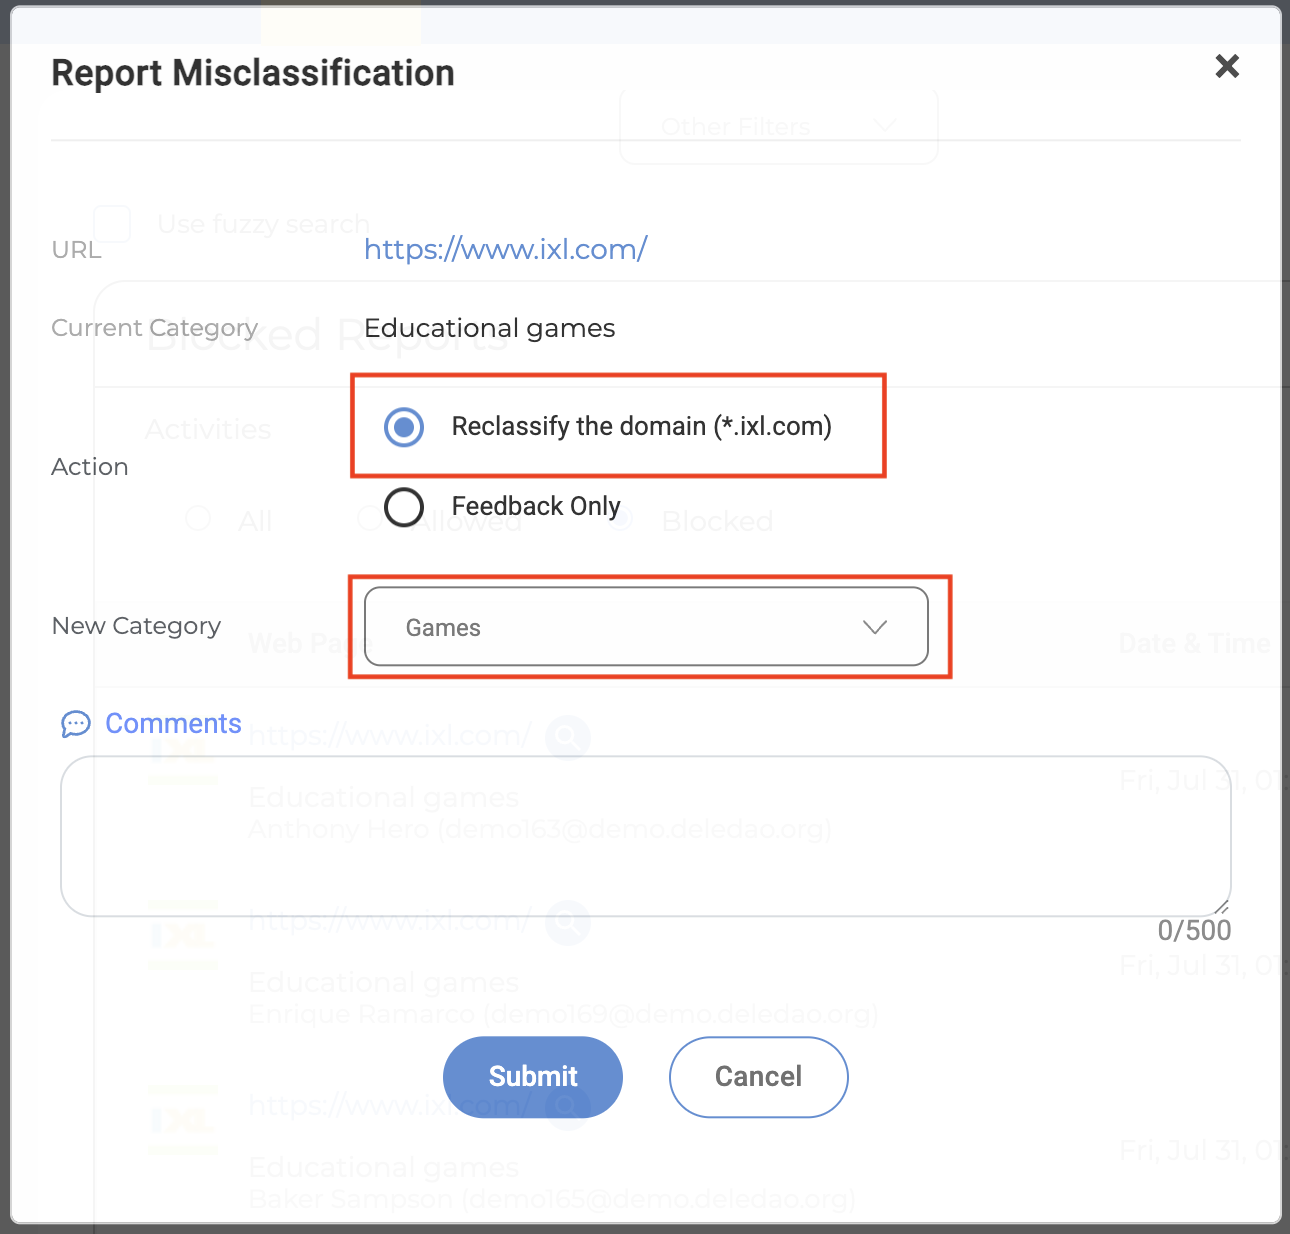
Select a New Category
After choosing either option:
- Select the category you would like the website assigned to.
- Enter any comments or additional details that may help the Deledao development team evaluate the request.
- Submit the change.
Processing Time
- New local reclassifications typically take effect immediately.
- If a previously reclassified site is updated to another category, the change may take up to 24 hours to be fully processed.
View Local Reclassifications
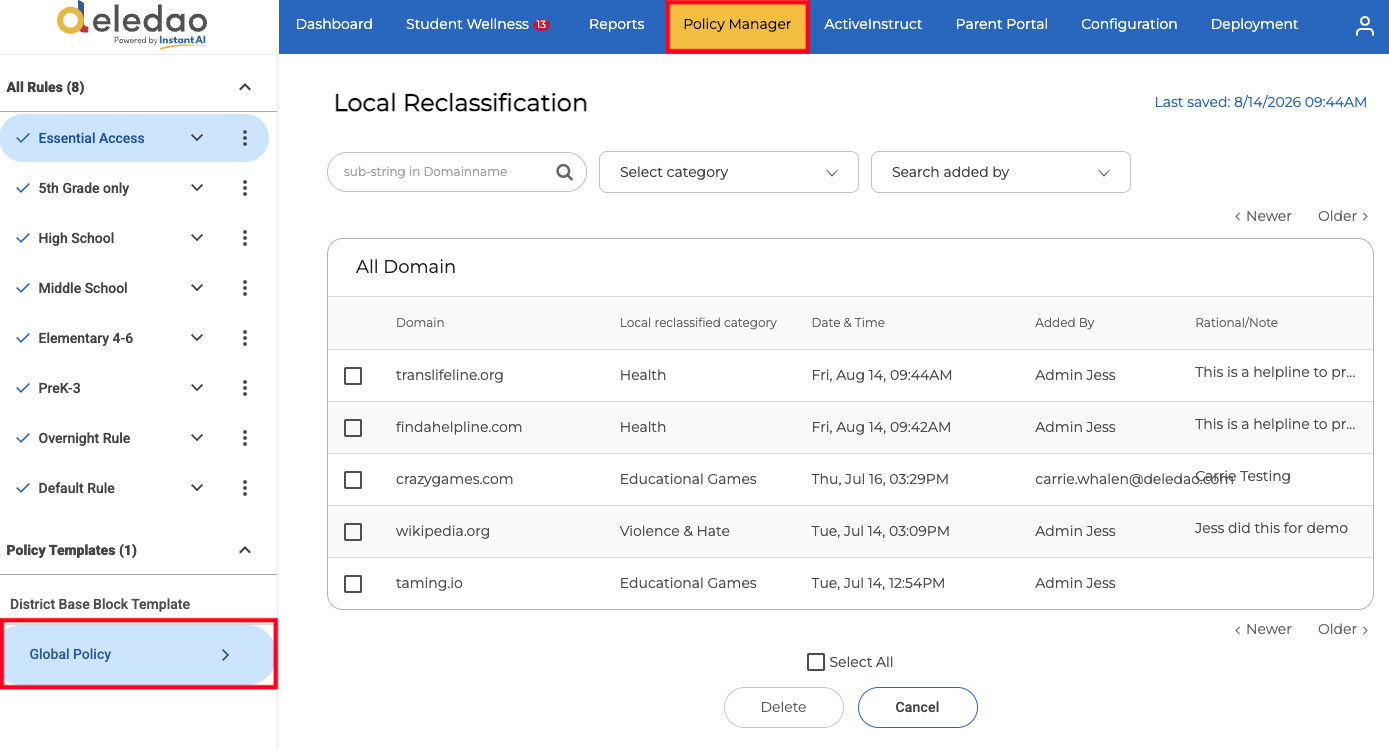
Administrators can review all locally reclassified websites at any time.
To view local reclassifications:
- Navigate to Policy Manager.
- Open Global Policy.
The Local Reclassification page displays:
- Reclassified domains
- Assigned categories
- Date of reclassification
- The administrator who created the reclassification
- Rational/Note for the change
This provides a centralized location to review and manage all district-level category overrides.
Remove a Local Reclassification
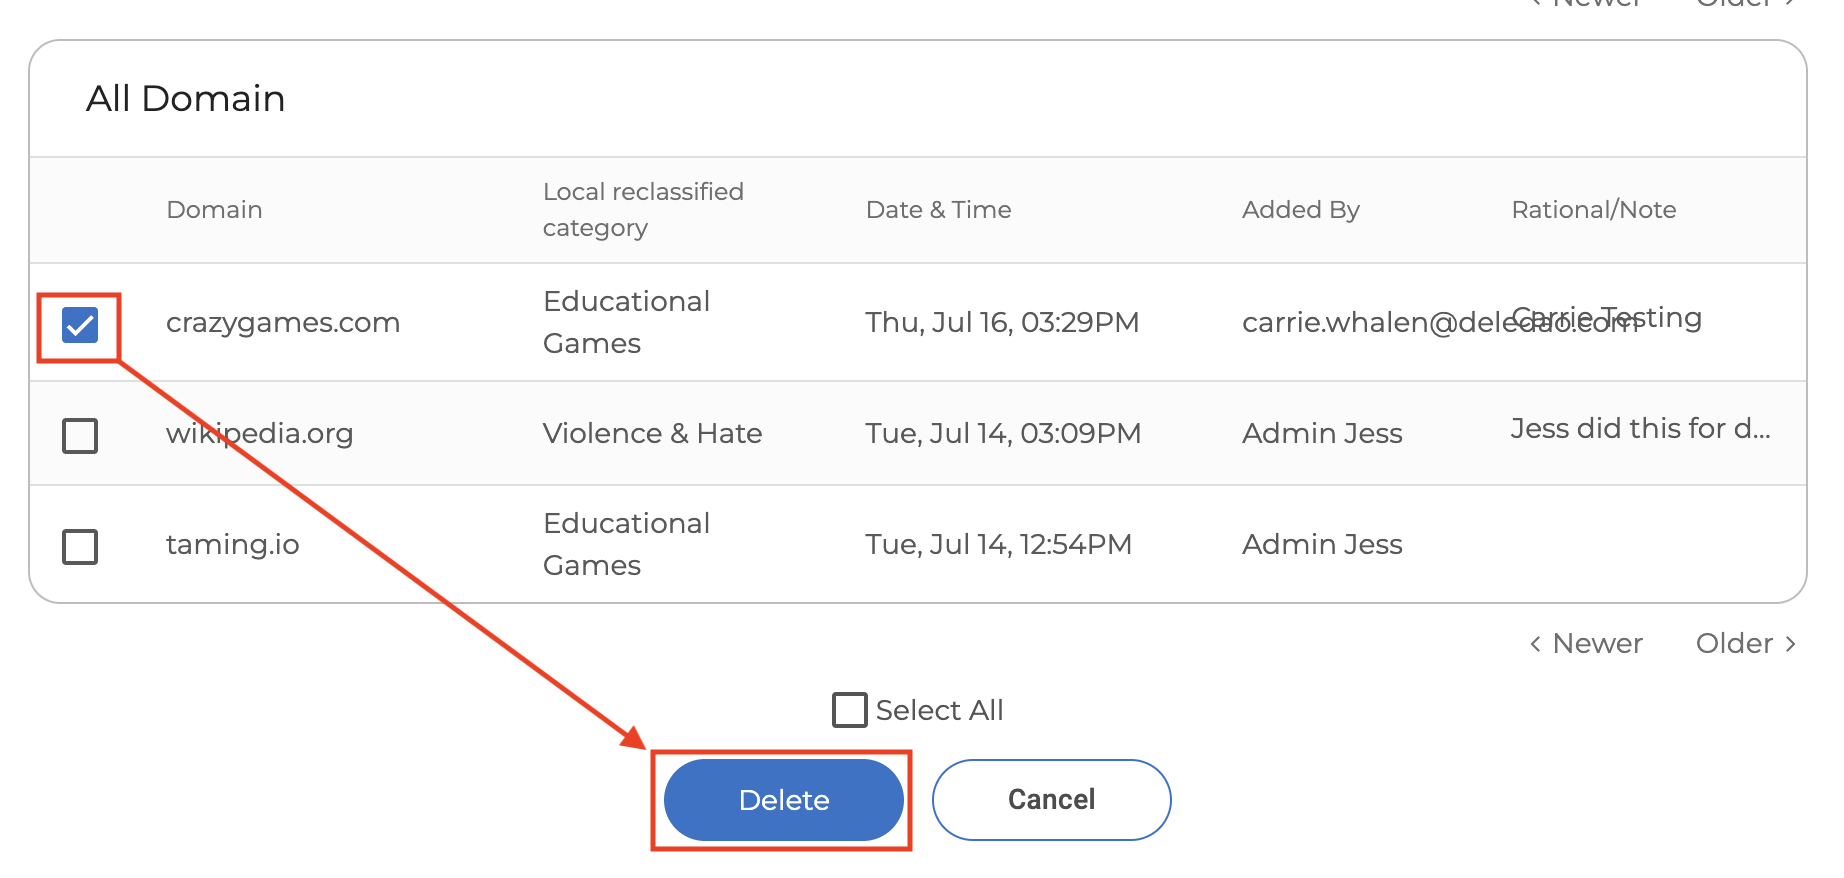
If a site should no longer use a local category override:
- Navigate to Policy Manager > Global Policy
- Select the checkbox next to the domain.
- Click Delete.
The local override will be removed and the site will resume using Deledao's standard categorization.
Add a Website to an Allow List
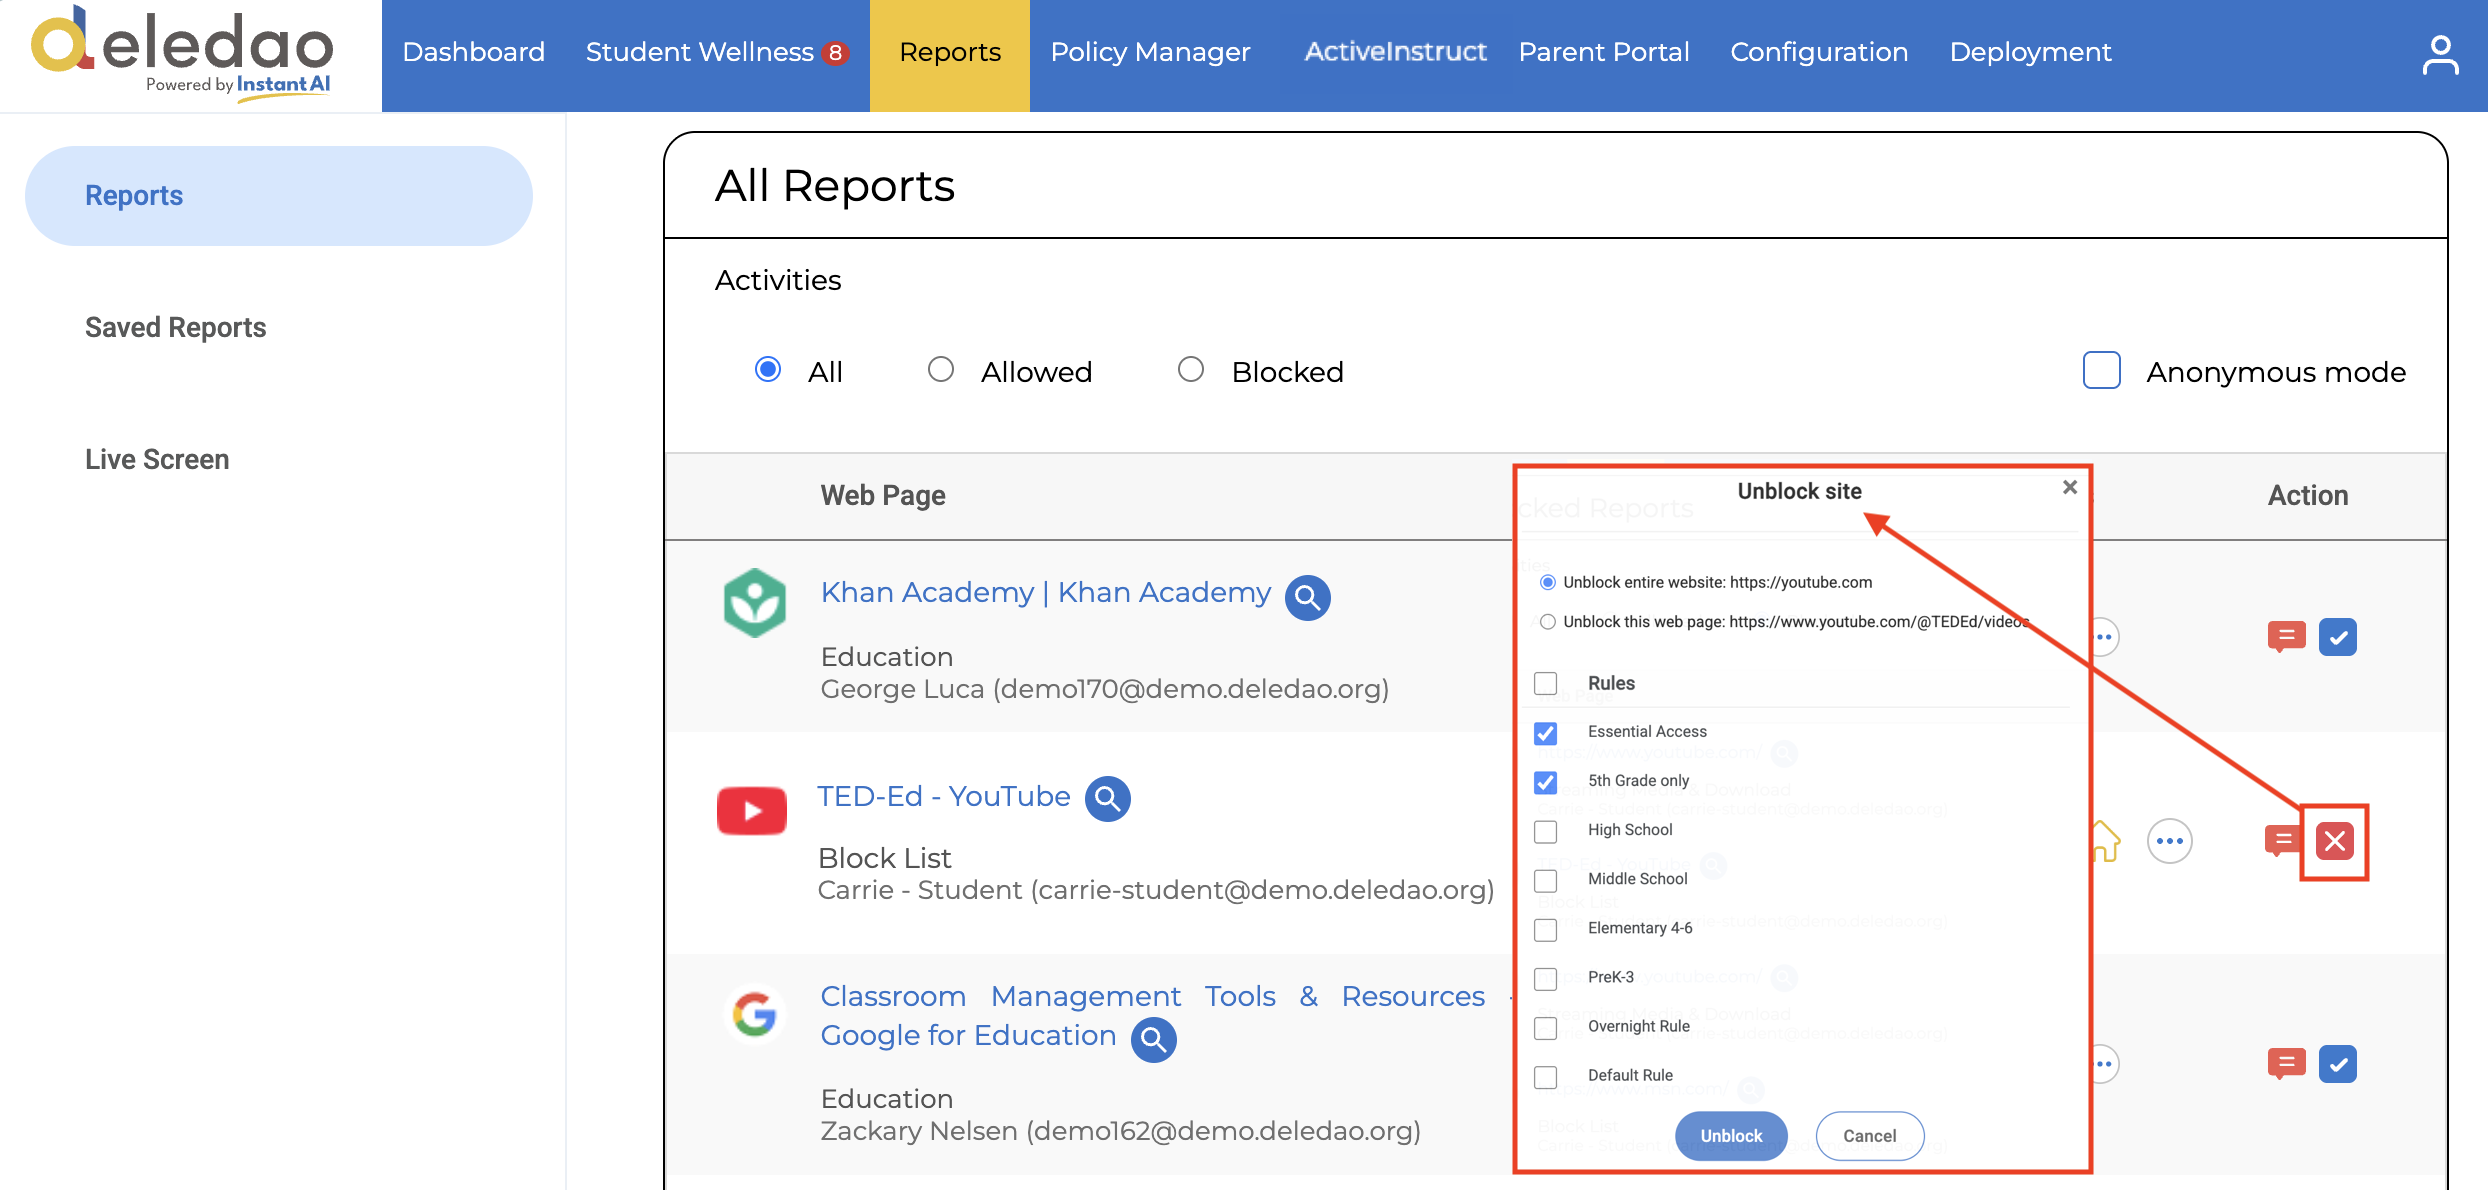
If a website is blocked but should be accessible:
- Select Add to Allowed List.
- Choose to unblock entire website or just exact web page.
- Choose the appropriate allow-list rule(s).
- Click Unblock to save the change.
The website will be added to the selected allow list.
Add a Website to a Blocked List
If a website should be blocked:
- Select Add to Blocked List.
- Choose the appropriate blocking rule.
- Choose the appropriate allow-list rule(s).
- Click Block to save the change.
The website will be added to the selected blocked list.
Download Reports
Reports can be exported for record keeping or further analysis.
- Click Download Report.
- Select:
- CSV
- Generate the report.
Save Reports
Saved reports allow administrators to quickly reuse commonly used filters.
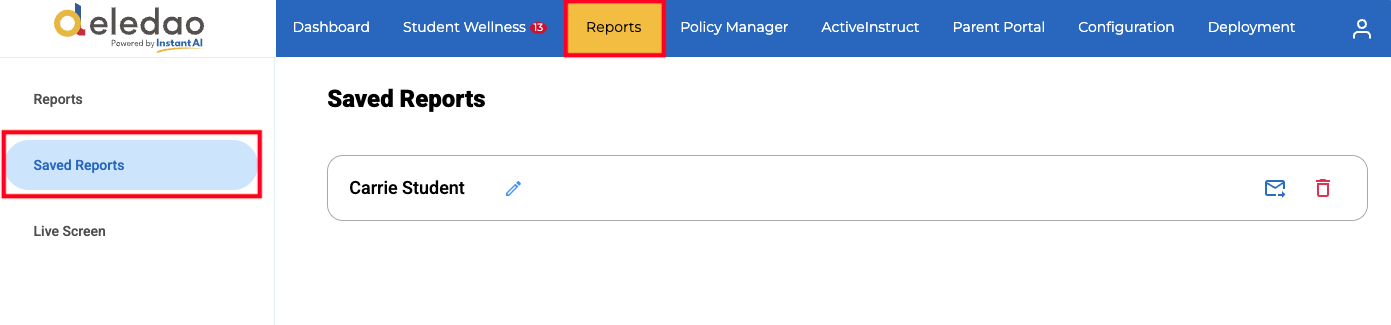
Save a Report
- Configure the desired filters.
- Click Save.
- Enter a report name.
The saved report stores all current filter settings.
Manage Saved Reports
Administrators can:
- Open saved reports
- Rename saved reports
- Delete saved reports
Schedule Email Reports
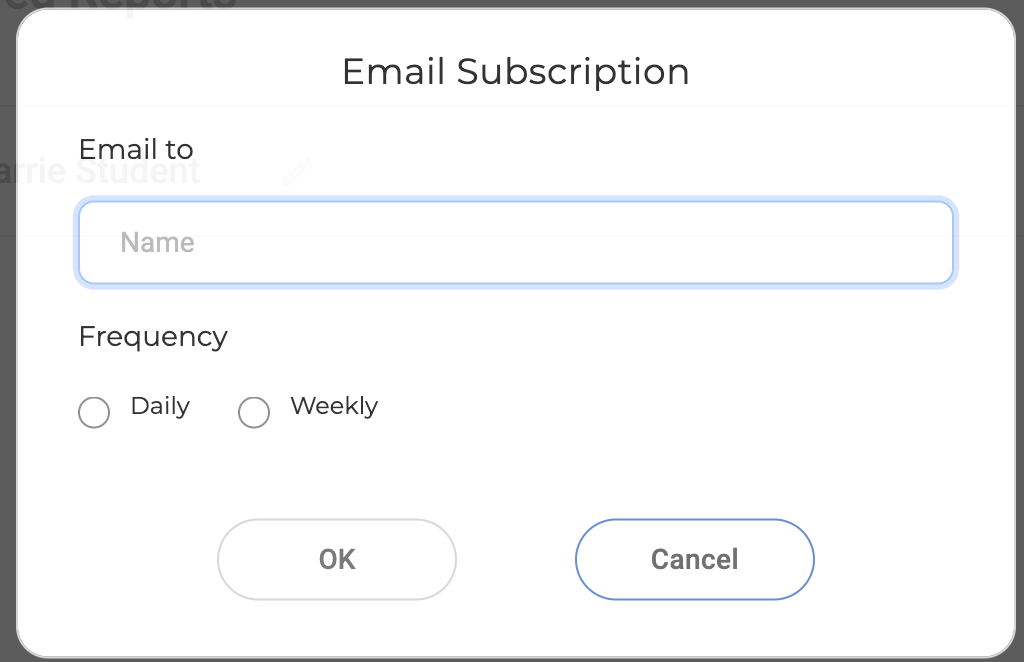
Reports can be automatically delivered by email.
Configure Email Delivery
- Select Email Report.
- Enter the destination email address.
- Choose:
- Daily
- Weekly
Administrators can modify or unsubscribe from scheduled reports at any time.
Common Troubleshooting Scenarios
Reports are often the fastest way to investigate filtering questions:
- Verify why a website was blocked or allowed.
- Identify the category assigned to a website.
- Determine whether activity occurred on campus or off campus.
- Review the policy and rule responsible for a filtering decision.
- Investigate browsing activity for individual users or groups.
- Locally reclassify miscategorized websites.
- Add websites directly to allow lists or block lists.
The Reports page serves as the primary tool for investigating filtering activity, troubleshooting access issues, and making immediate policy adjustments when needed.
© Deledao Education