
Table of Contents
- Access the Classroom Dashboard
- Import Rostered Classes
- Refresh Rosters
- Create a Manual Classroom
- Add Students to a Classroom
- Configure Classroom Settings
- Share a Classroom with Another Educator
- Set Up Classroom Schedules
- Automatically Start Scheduled Classrooms
- What's Next?
ActiveInstruct provides multiple ways to create and manage classrooms. You can import classes from Google Classroom or other Rostering methods, create manual classes, share classes with other educators, and configure schedules to automatically start and end classroom sessions.
This guide explains how to set up and organize your classrooms before starting a Live Classroom session.
Audience: Teachers
Access the Classroom Dashboard
- Sign in to ActiveInstruct.
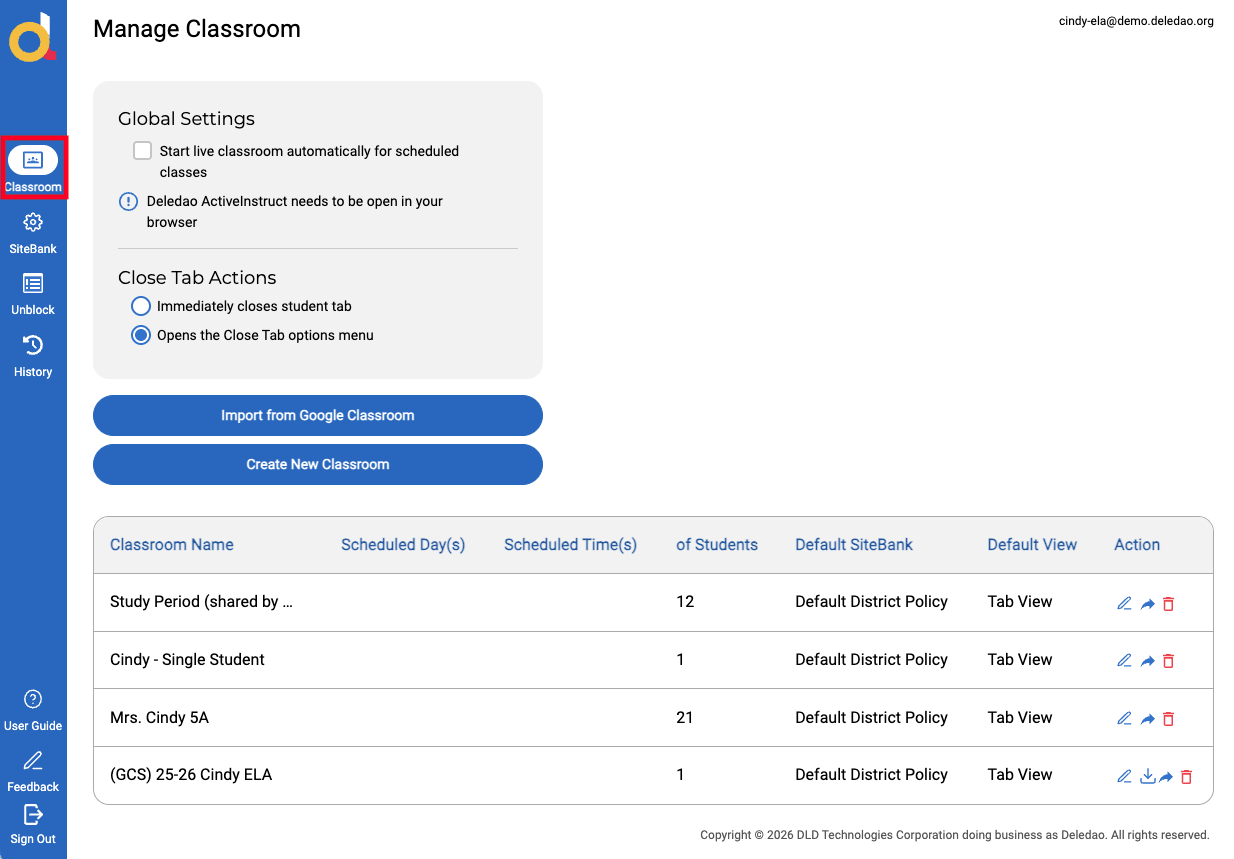
- Select Classroom from the Navigation Rail.
The Manage Classroom page displays all of your ActiveInstruct classes and provides access to classroom creation, scheduling, sharing, and management tools.
Import Rostered Classes
If your district uses a class rostering platform, such Google Classroom, ActiveInstruct can import your existing classes and rosters.
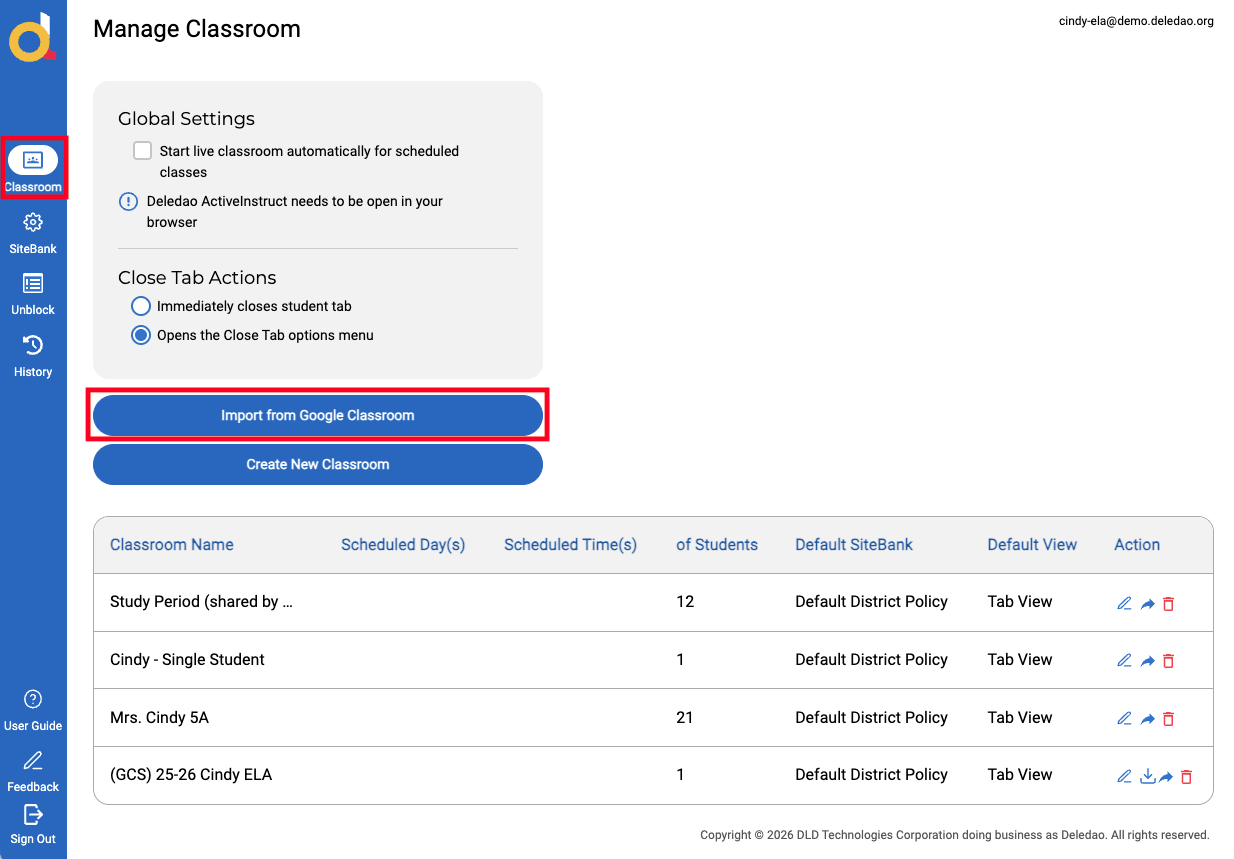
- From the Manage Classroom page, select Import from Google Classroom (or whichever rostering method selected by your Tech Admin).
- Verify the import.
- Complete the import process.
After importing, your classes and enrolled students will appear in your classroom list.
Why Import Rostered Classes?
Importing classes allows you to take advantage of the work you or your Tech Admin has already completed rather than creating classes and rosters manually.
Refresh Rosters
Roster changes are not always automatically synchronized to ActiveInstruct.
If students have been added, removed, or transferred:
- Return to the Manage Classroom page.
- Select Import from... again.
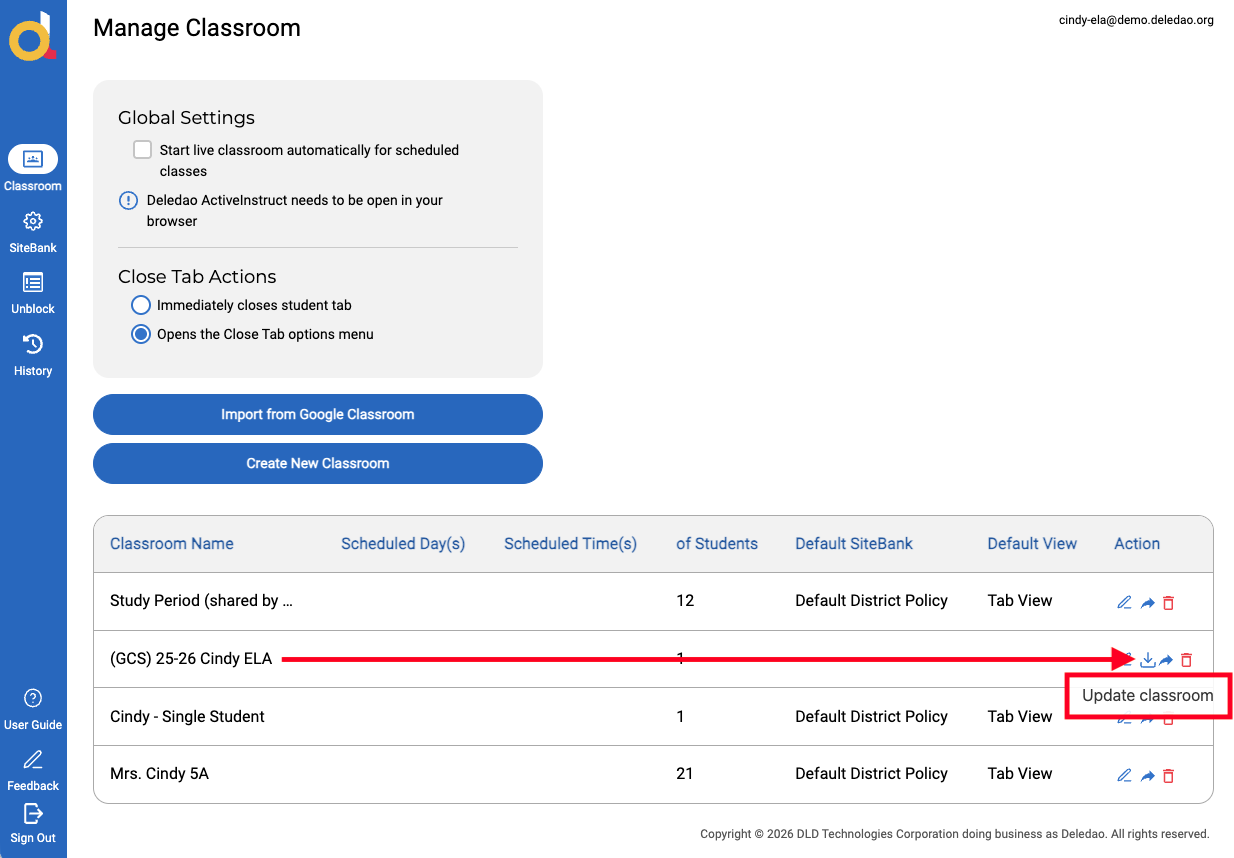
- Update your imported classes.
To individually update the roster of a single class, select the Update Classroom button in the Action column of the list of Classes.
Best Practice
At the beginning of a school year, semester, or grading period, refresh your classes to ensure your rosters reflect the latest student enrollments.
Create a Manual Classroom
Manual classrooms are useful when you need to work with students outside of a traditional rostered class.
Examples include:
- Intervention groups
- SPED services
- Counseling sessions
- After-school programs
- Study halls
- Small-group instruction
To create a manual classroom:
- Select Create New Classroom.
- Configure the classroom settings.
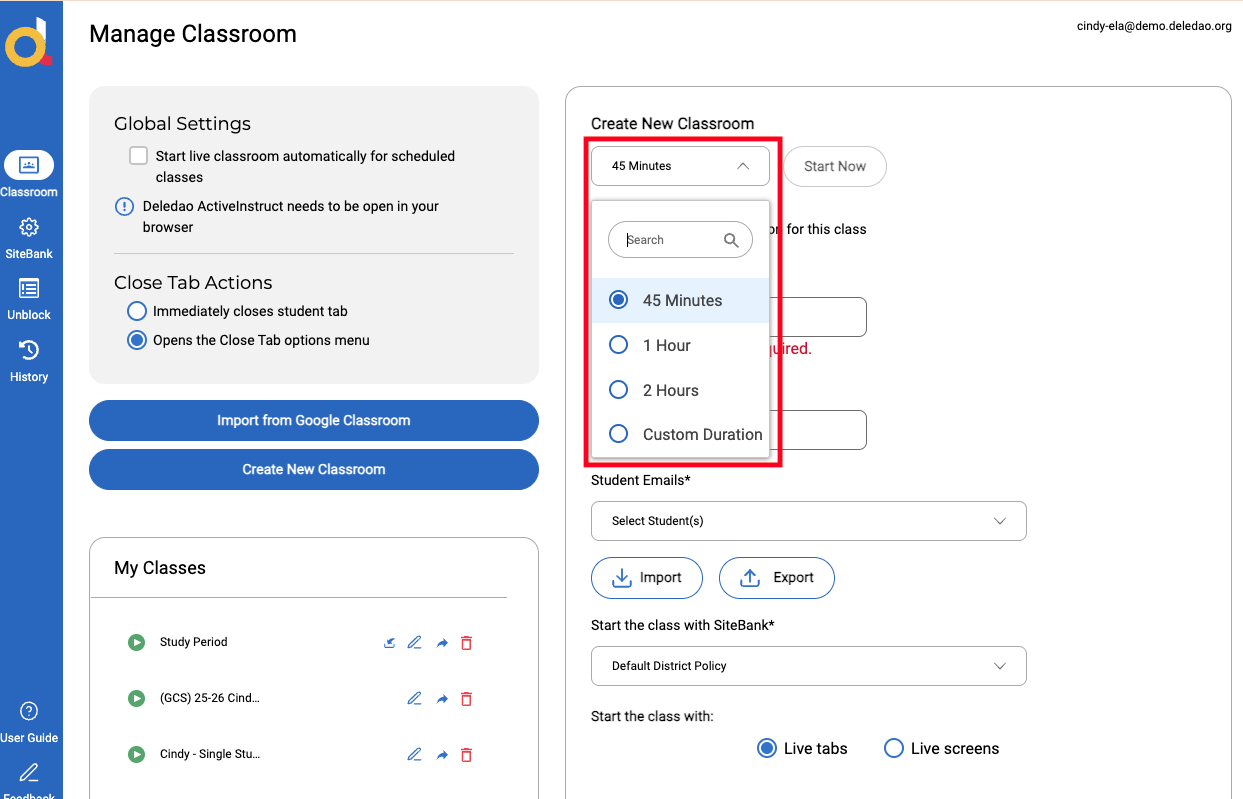
Class Duration
Select a duration for the classroom session:
- 45 Minutes
- 1 Hour
- 2 Hours
- Custom Duration
A classroom duration helps ensure sessions end appropriately.
Important: A student can only participate in one ActiveInstruct Live Classroom session at a time.
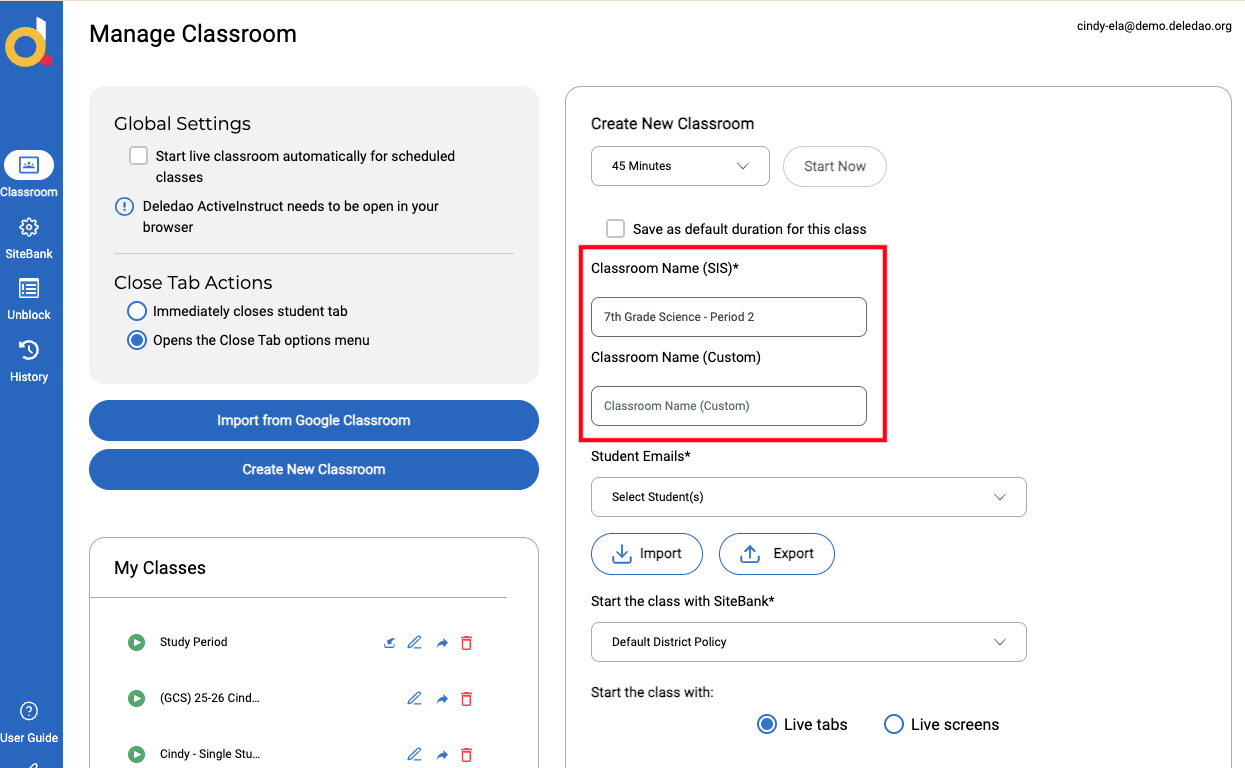
Classroom Name
Enter a meaningful classroom name.
Example: 7th Grade Science - Period 2
If the classroom was imported from a roster, the classroom name is automatically populated. You may optionally provide a custom classroom name.
Add Students to a Classroom
Manage Classroom Rosters
You can update classroom rosters at any time by:
- Adding students
- Removing students
- Refreshing imported rosters
Rostered Classes
Students are automatically added based on the rostering method configured by your administrator. Additional students may not be added. If using Google Classroom, add or remove students from the Google Classroom class and Import into ActiveInstruct to update the roster in ActiveInstruct.
Manual Classes
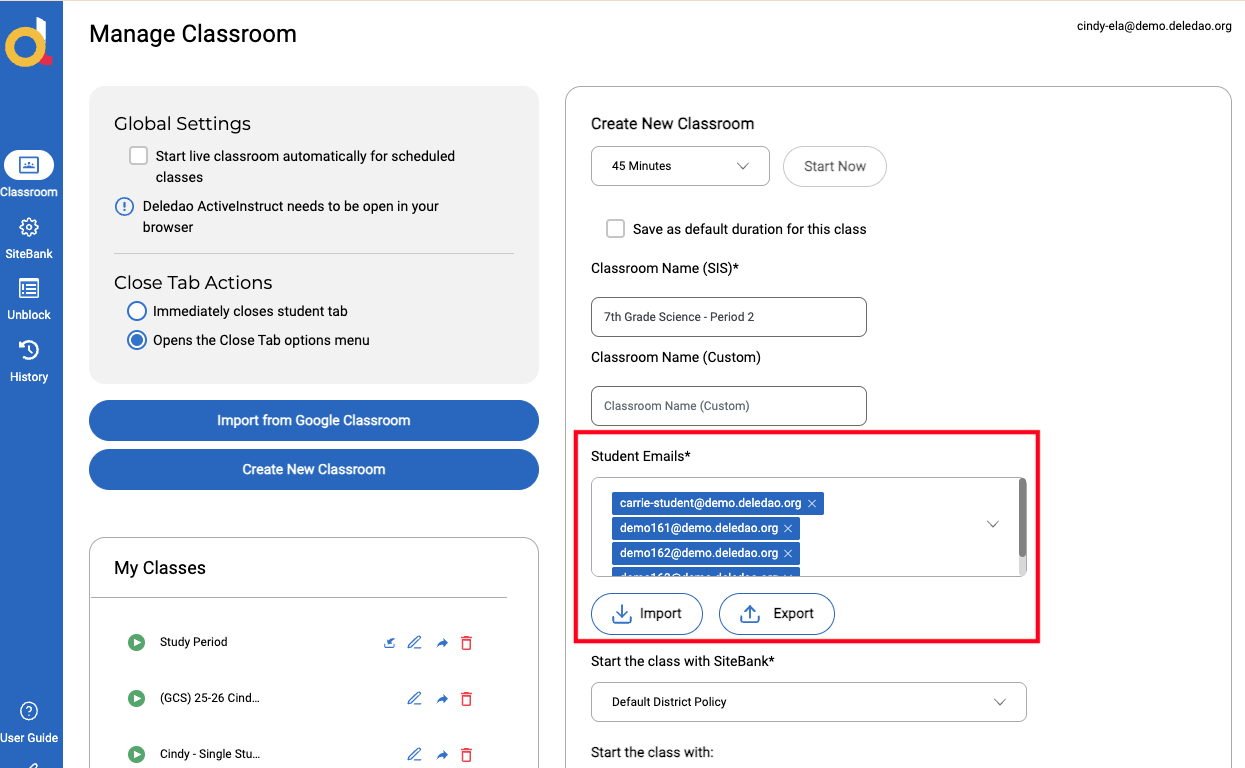
You can manually add students by searching for and selecting individual students.
- Select the student field.
- Search by student name or email address.
- Select the students to include.
For larger groups, student lists can also be imported when creating manual classrooms.
Configure Classroom Settings
Start Class with SiteBank
Select the SiteBank that will be applied when the classroom starts.
The default option is Default District Policy. This means the web filtering that your Tech Admin has selected for these students will apply.
SiteBanks allow teachers to guide student learning by focusing students on the resources needed for a specific lesson.
Additional information about SiteBanks is available in Manage Allow and Block SiteBanks in ActiveInstruct.
Start Class With
Choose the default classroom view used when the session begins.
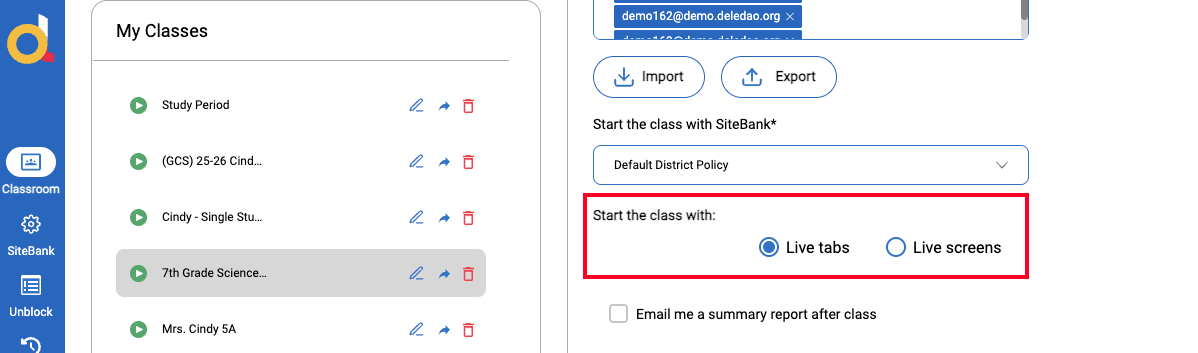
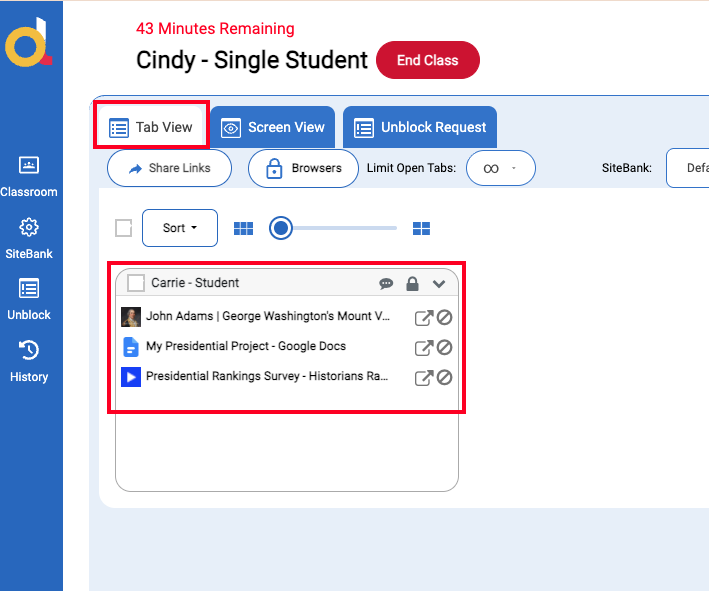
Live Tabs
Displays the browser tabs currently open on student devices.
This view provides a broad overview of student activity and open resources.
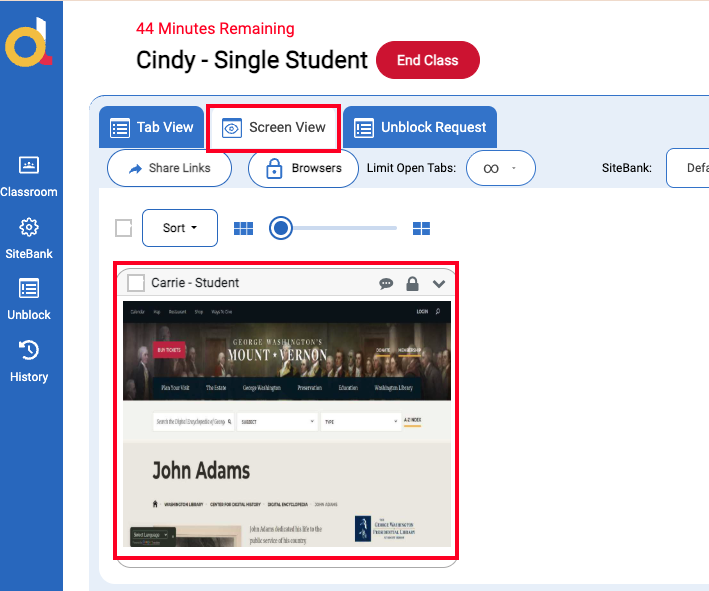
Live Screens
Displays the active screen being viewed on each student's device.
This view provides a visual snapshot of student activity.
Email Classroom Reports
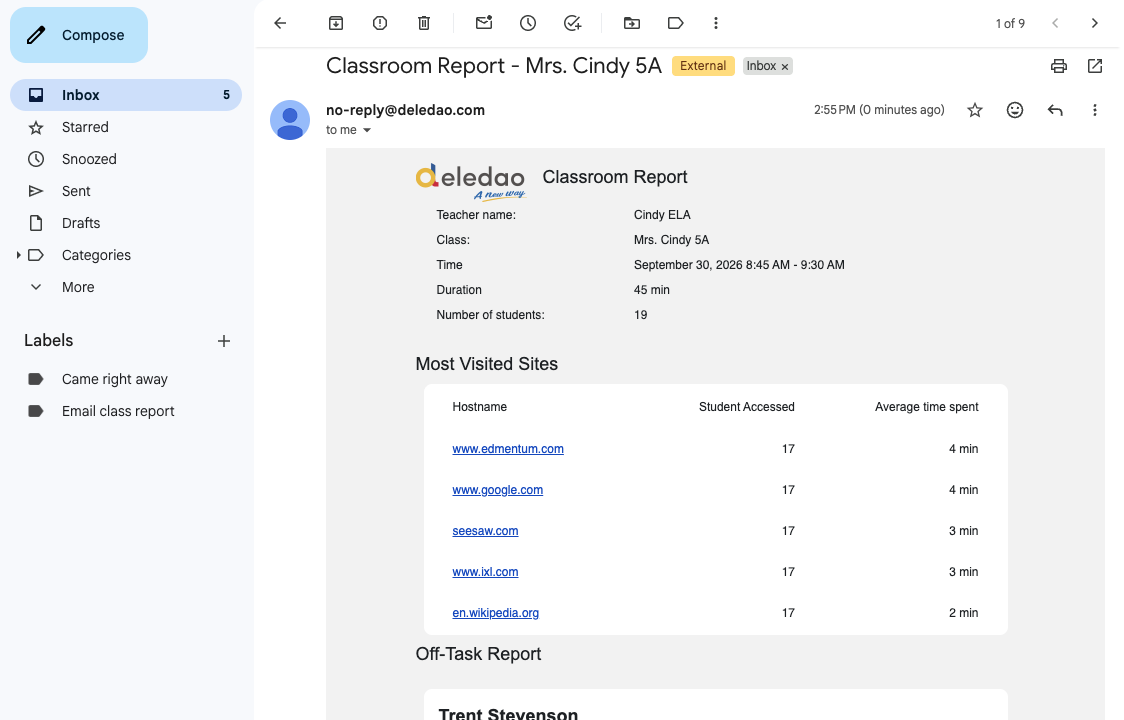
Teachers may choose to have classroom history reports emailed automatically after classroom sessions.
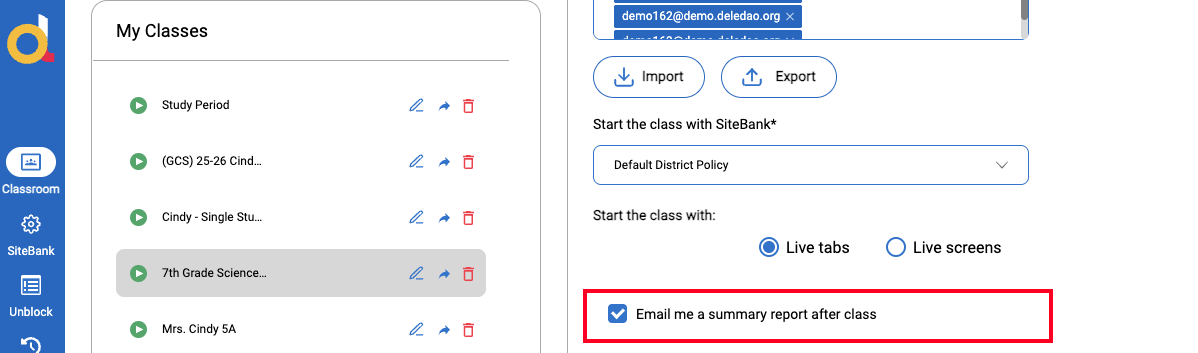
If enabled, summary reports are delivered automatically. Otherwise, reports remain available through Classroom History.
Share a Classroom with Another Educator
ActiveInstruct supports co-teaching and classroom sharing.
Shared classrooms are commonly used by:
- Counselors
- SPED teachers
- Paraprofessionals
- Interventionists
- Co-teachers
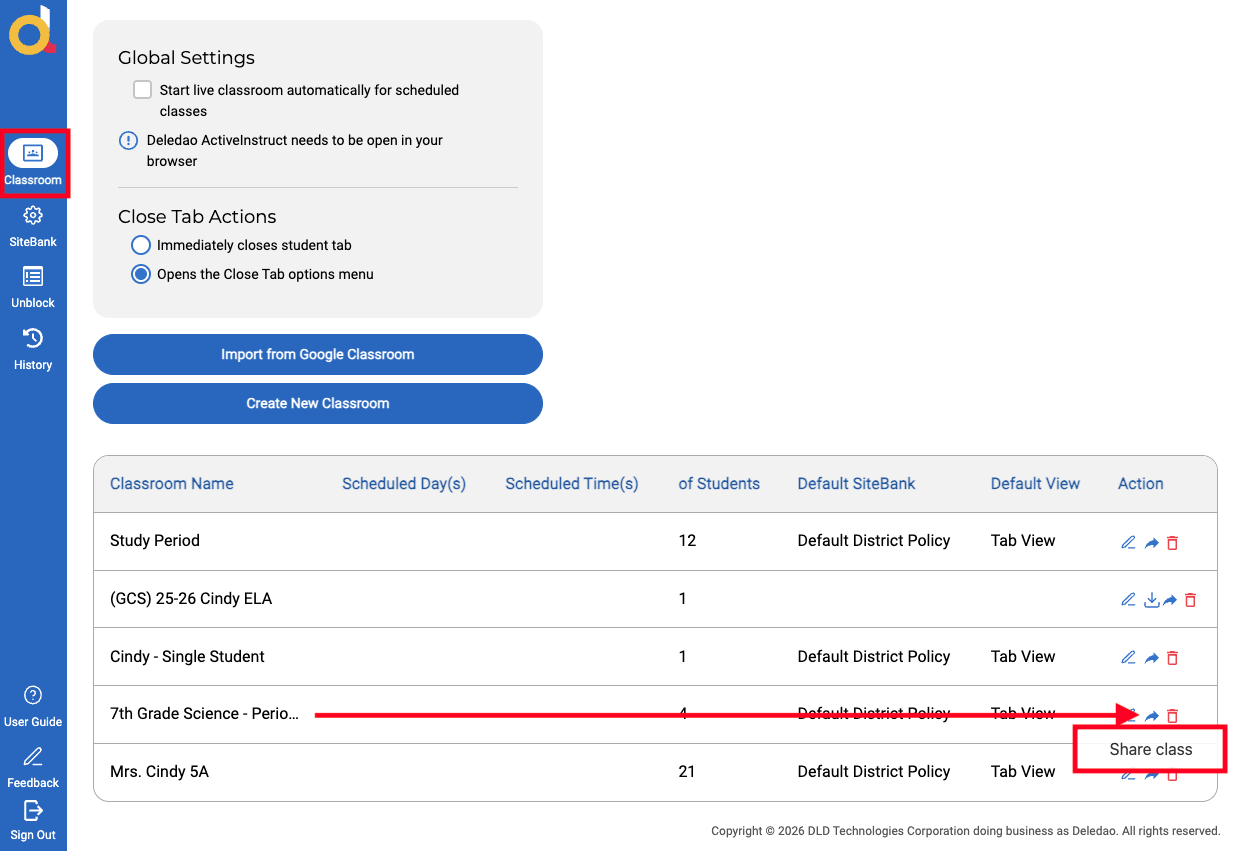
To share a classroom:
- Locate the classroom in your classroom list.
- Select the Share option.
- Choose the educator who should have access.
The shared classroom will appear in the other educator's classroom list.
Important Notes About Shared Classrooms
- Multiple educators can monitor and manage the same classroom.
- Shared classrooms support collaborative instruction.
- Students can only participate in one live classroom session at a time.
A dedicated article covering co-teaching and shared classroom workflows will be available separately.
Set Up Classroom Schedules
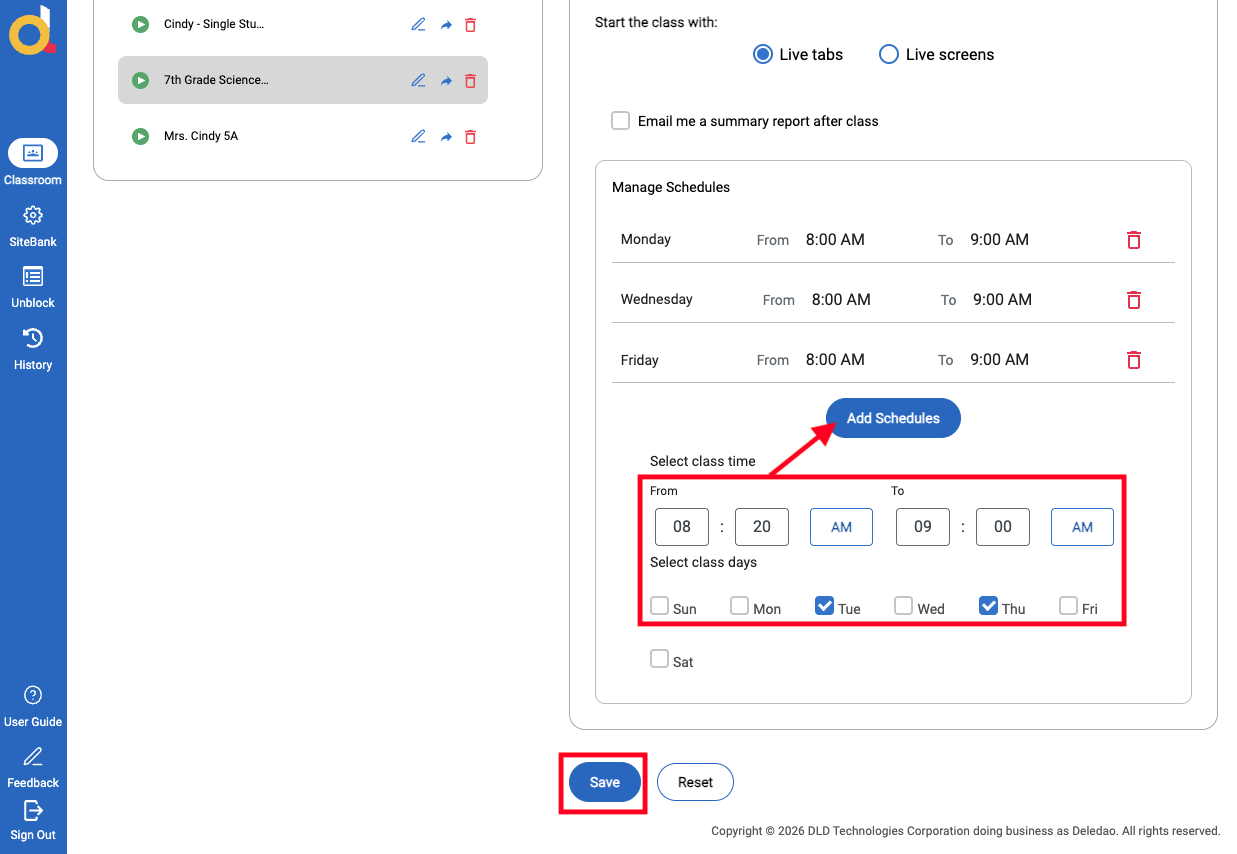
Classroom schedules allow sessions to start and end automatically at predetermined times.
Scheduling can be configured for:
- Daily classes
- Alternating schedules
- Block schedules
- After-school programs
- Different schedules on specific days of the week
To create a schedule:
- Open the classroom settings.
- Configure the days and times the classroom should run.
- Save your changes.
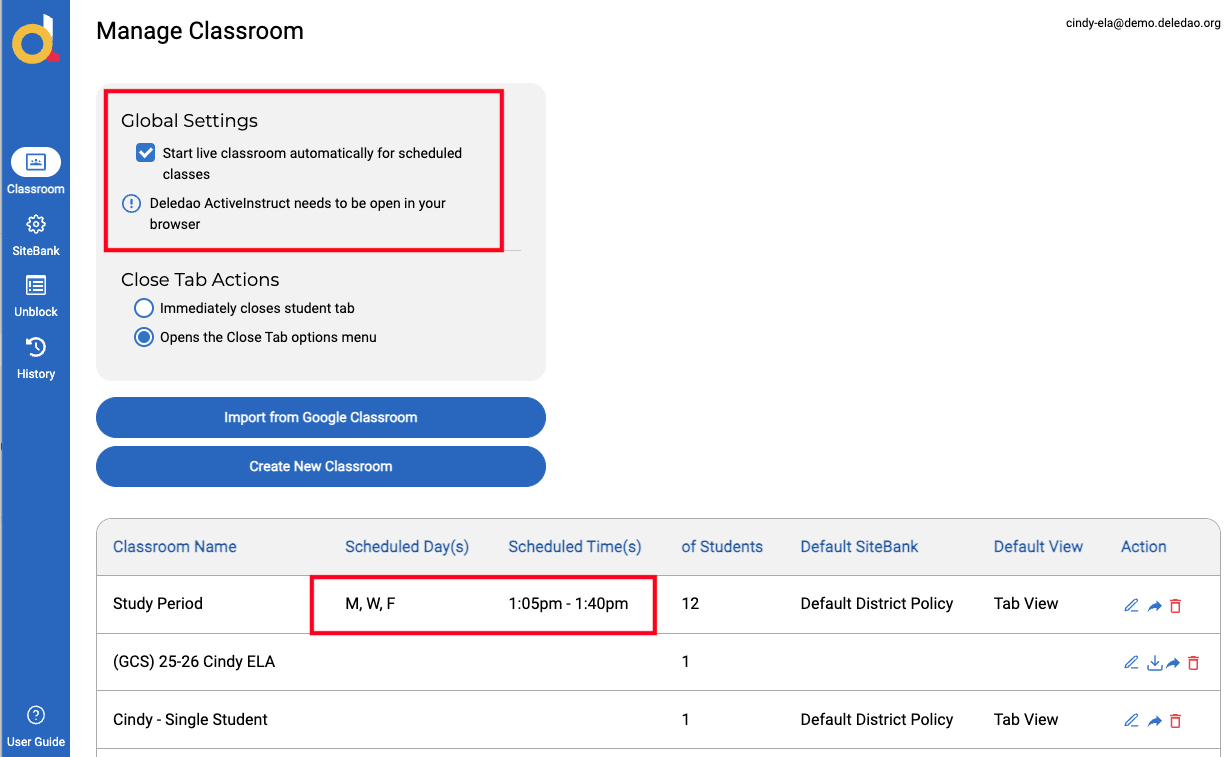
Scheduled classes appear on the Manage Classroom dashboard.
Automatically Start Scheduled Classrooms
If you use classroom schedules, ActiveInstruct can automatically start and end classroom sessions for you when ActiveInstruct is open in your browser.
To enable automatic classroom management:
- Open Global Settings.
- Enable Start Live Classroom Automatically for Scheduled Classes.
When enabled:
- Classes start automatically at the scheduled time.
- Classes end automatically at the scheduled end time.
- Teachers do not need to manually start or stop classroom sessions.
This feature can help reduce classroom setup time and ensure students move smoothly between classes.
What's Next?
Once your classrooms have been created and organized, continue to Live Classroom Overview to learn how to:
- Start a classroom session
- Monitor student activity
- Switch between Tab View and Screen View
- Send messages
- Take screenshots
- Apply SiteBanks
- Manage groups
- Lock browsers
- Review alerts
© Deledao Education