
Table of Contents
- Start a Live Classroom
- Understanding Classroom Views
- Monitor Student Activity
- Use Student Cards
- Send Messages
- Take Screenshots
- Lock Browsers
- Exclude Students from a Class
- Manage Browser Tabs
- Share Links with Students
- Share Links with Proactive Unblock
- Classroom Alerts
- Student Communication Tools in Microsoft Environments
- What's Next?
ActiveInstruct Live Classroom provides real-time visibility into student online activity during class. Teachers can monitor student screens, view open browser tabs, communicate with students, guide learning activities, and manage classroom devices from a single interface.
This article introduces the core tools available during a Live Classroom session.
For information about creating and organizing classes, see Creating and Organizing Classrooms. For information about using SiteBanks to guide instruction, see Using SiteBanks to Guide Learning.
Audience: Teachers
Start a Live Classroom
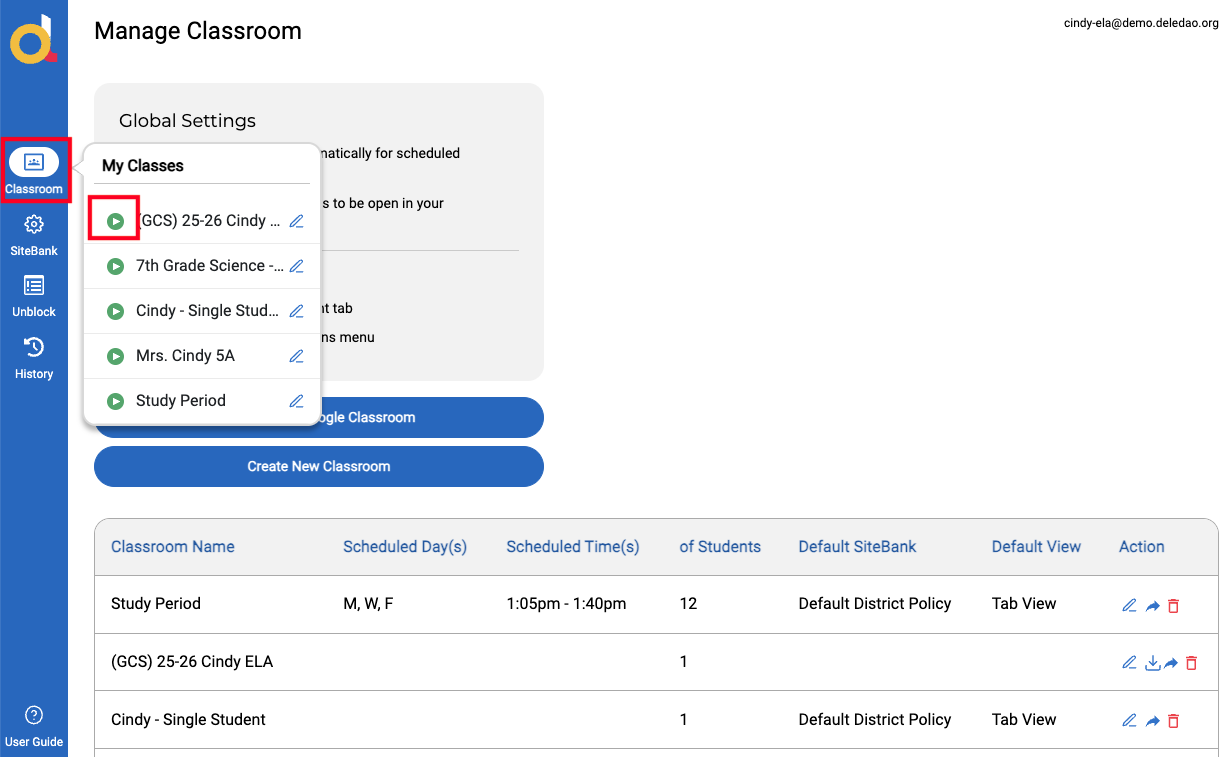
You can start a classroom session from the Classroom dashboard.
To start a class:
- Navigate to Classroom.
- Locate the class you want to start.
- Select the green Play button next to the class name.
You can also select Start Now from within the classroom.
Note: A maximum of five classroom sessions can run simultaneously. If five sessions are already running, one session must be stopped before another can be started.
Understanding Classroom Views
ActiveInstruct provides two primary classroom monitoring views.
Tab View
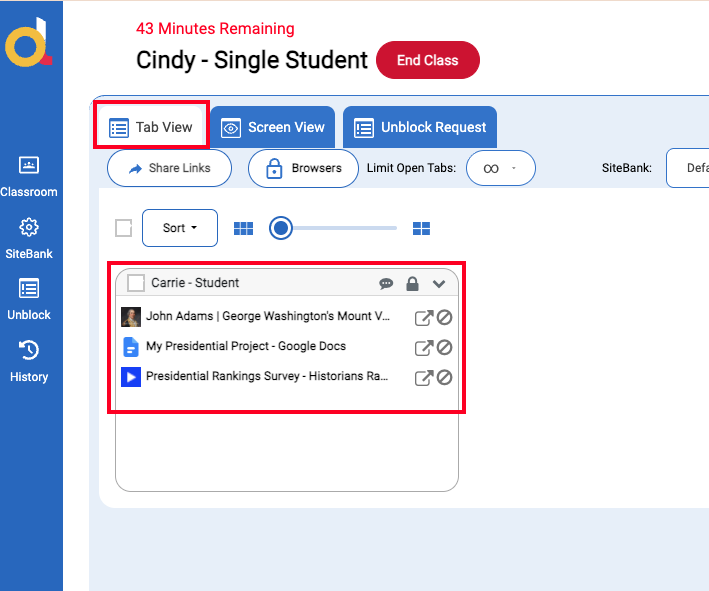
Tab View displays the browser tabs currently open on student devices.
This view allows teachers to:
- Quickly see what students are accessing
- Identify off-task browsing
- View blocked websites
- Close tabs when necessary
Many teachers prefer Tab View because it provides a broader view of student activity across the entire class.
Screen View
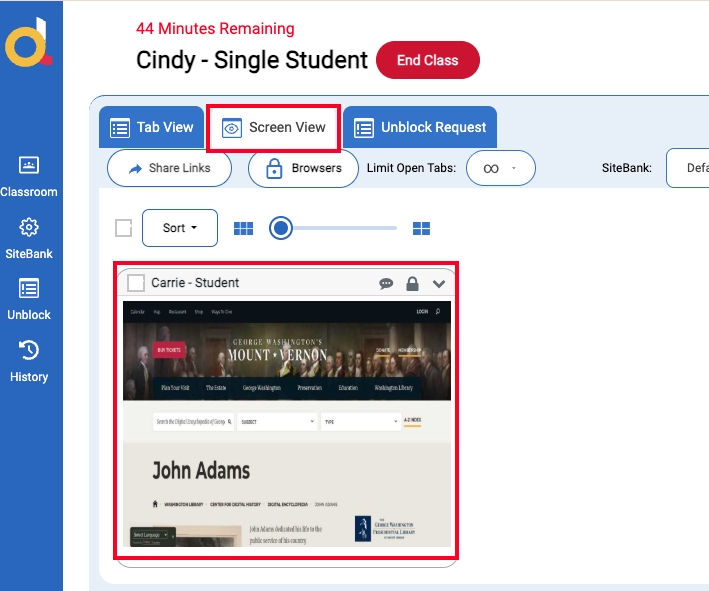
Screen View displays the active screen currently visible on a student's device.
This view is useful when you want a closer look at what a student is doing in real time.
Switching Between Views
Teachers can switch between Tab View and Screen View at any time during a classroom session.
Monitor Student Activity
Live Classroom allows teachers to monitor student activity in real time.
From the Classroom dashboard, you can:
- View student screens
- View open tabs
- Identify blocked websites
- Monitor classroom engagement
- Review browsing activity during instruction
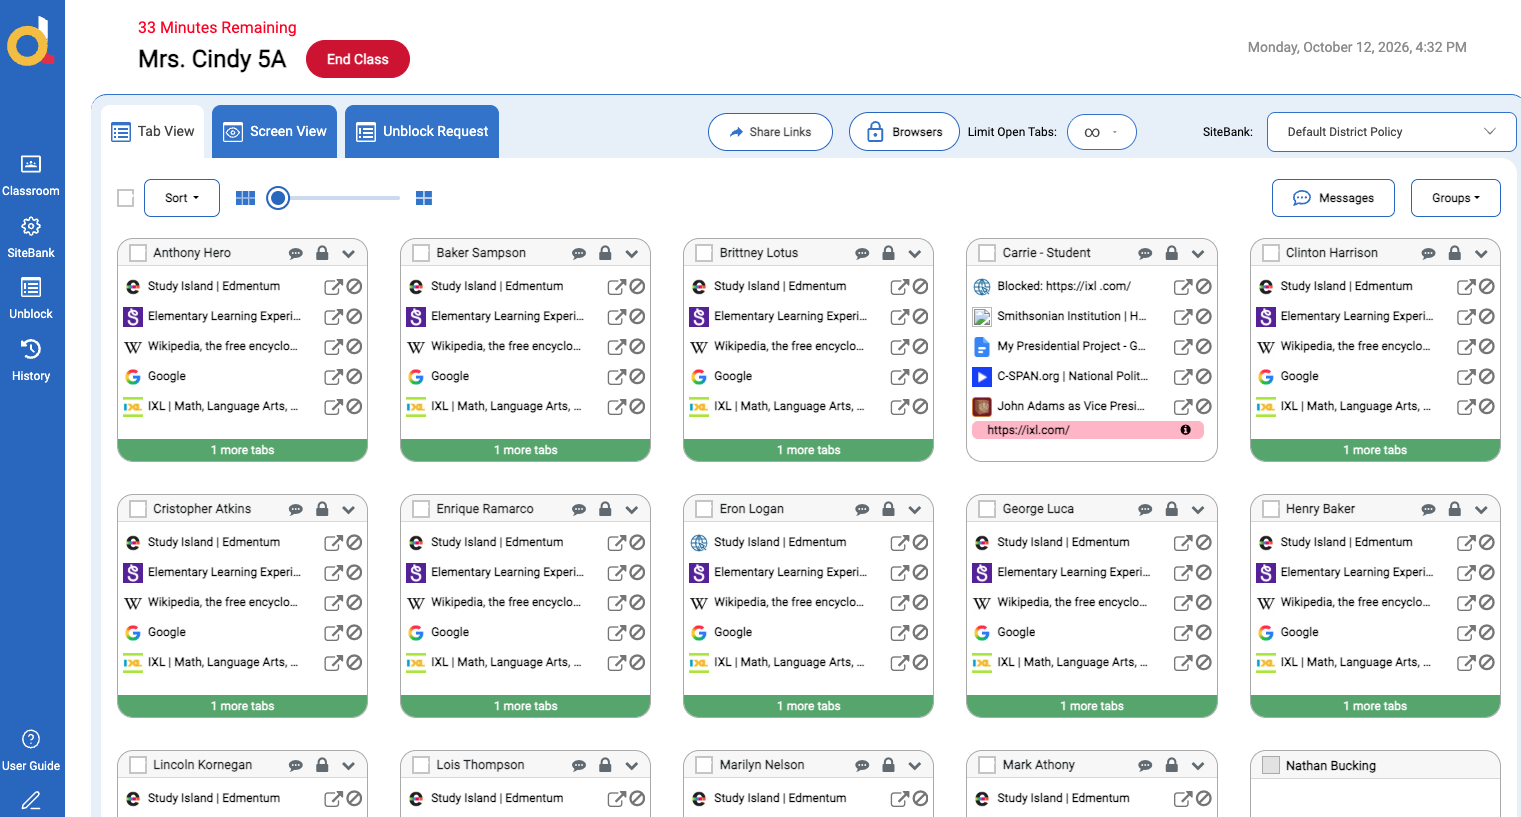
Blocked websites appear highlighted in red while viewing student tabs.
Use Student Cards
Each student appears as an individual student card during a Live Classroom session.
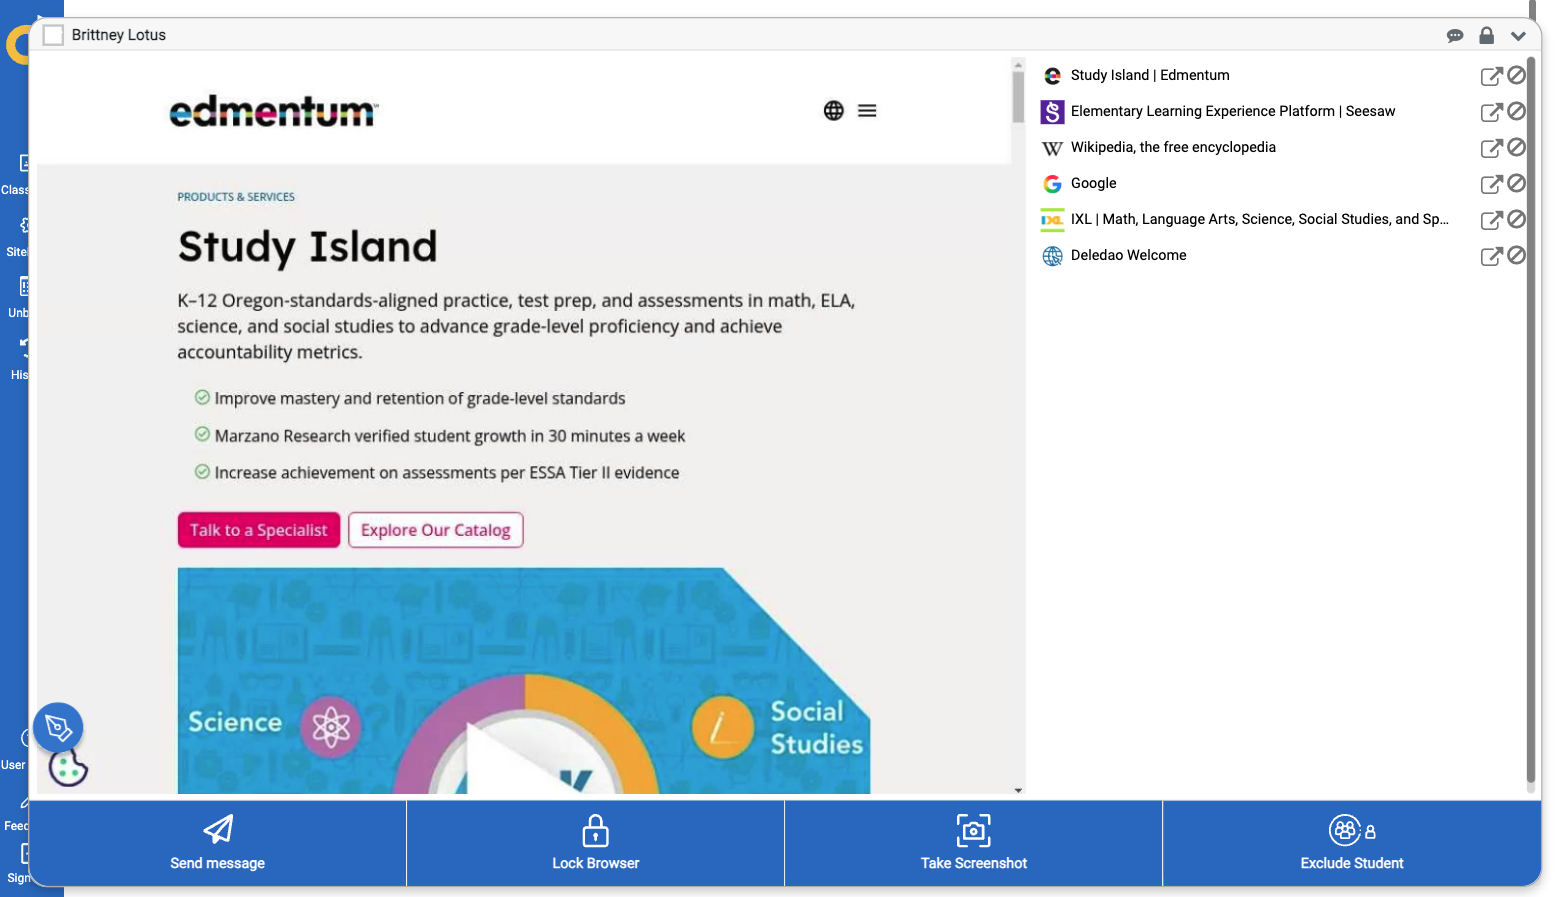
Selecting a student card by clicking on the student name provides additional classroom management options and a closer view of student activity.
Teachers can:
- View a student's screen
- View open tabs
- Send messages
- Take screenshots
- Lock the student's browser
- Annotate on the student's screen
- Exclude the student from the classroom
Student View Options
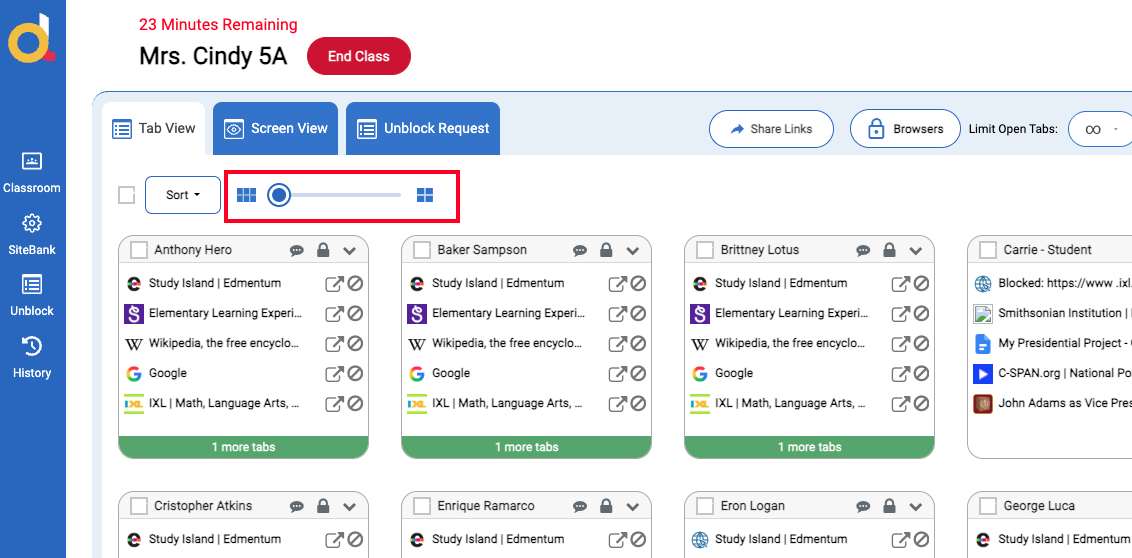
Student cards can be viewed in several layouts.
Small View
Displays all students in smaller windows. Slide the size selector all the way to the left to see as many tiles as possible in one row.
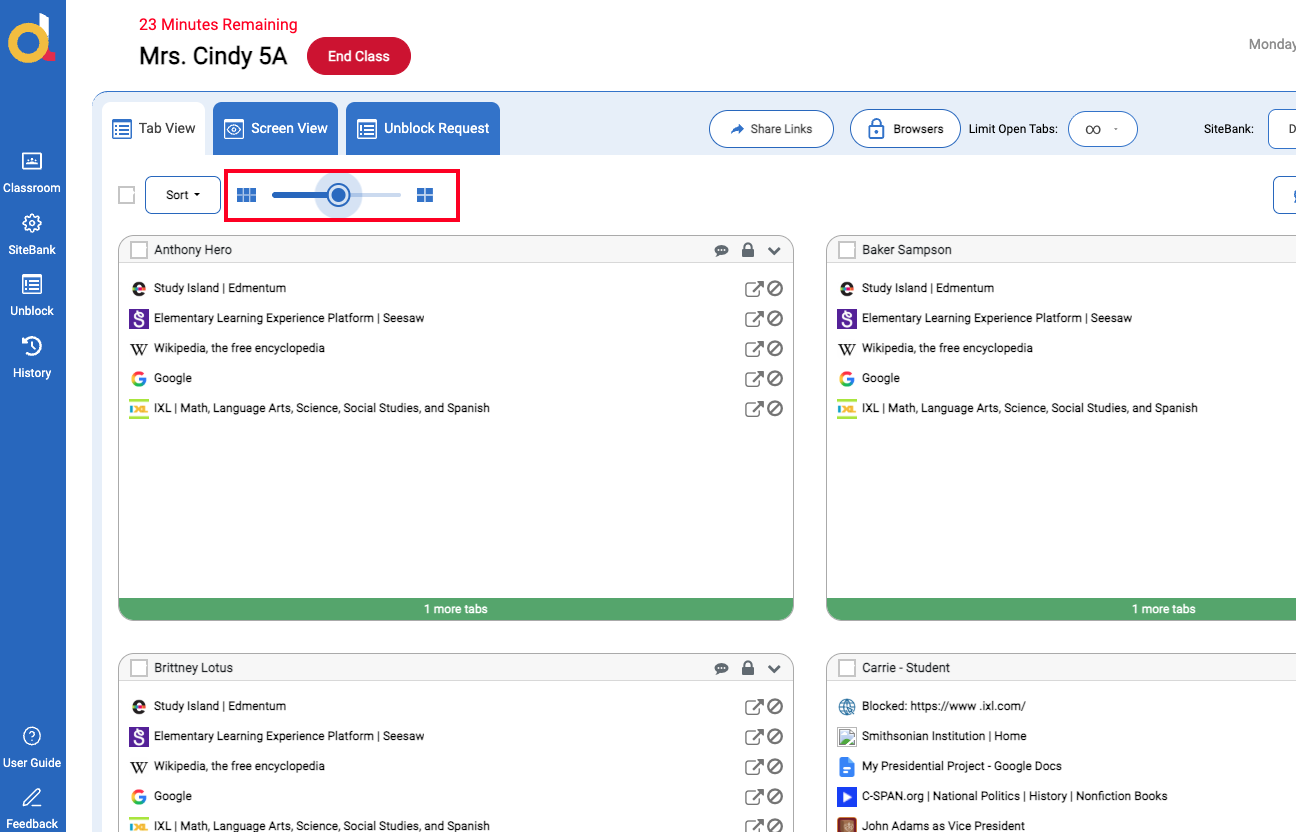
Large View
Slide the size selector farther right to make each student tile larger.
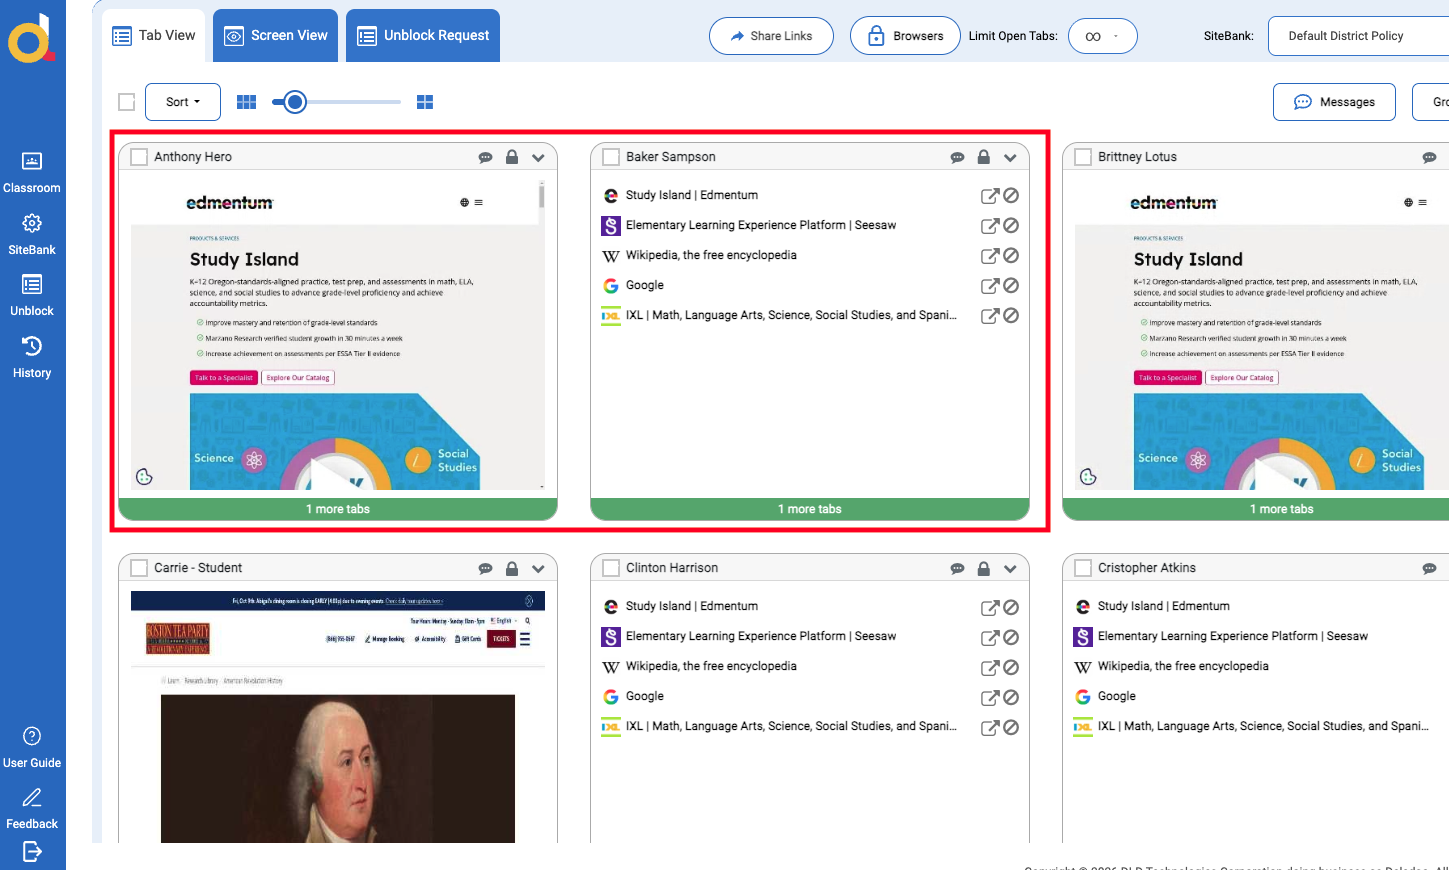
Split View
Displays some student's screens and other student's tabs by clicking on the center of the student card, to toggle back and forth between the two.
Send Messages
Teachers can communicate directly with students during a Live Classroom session.
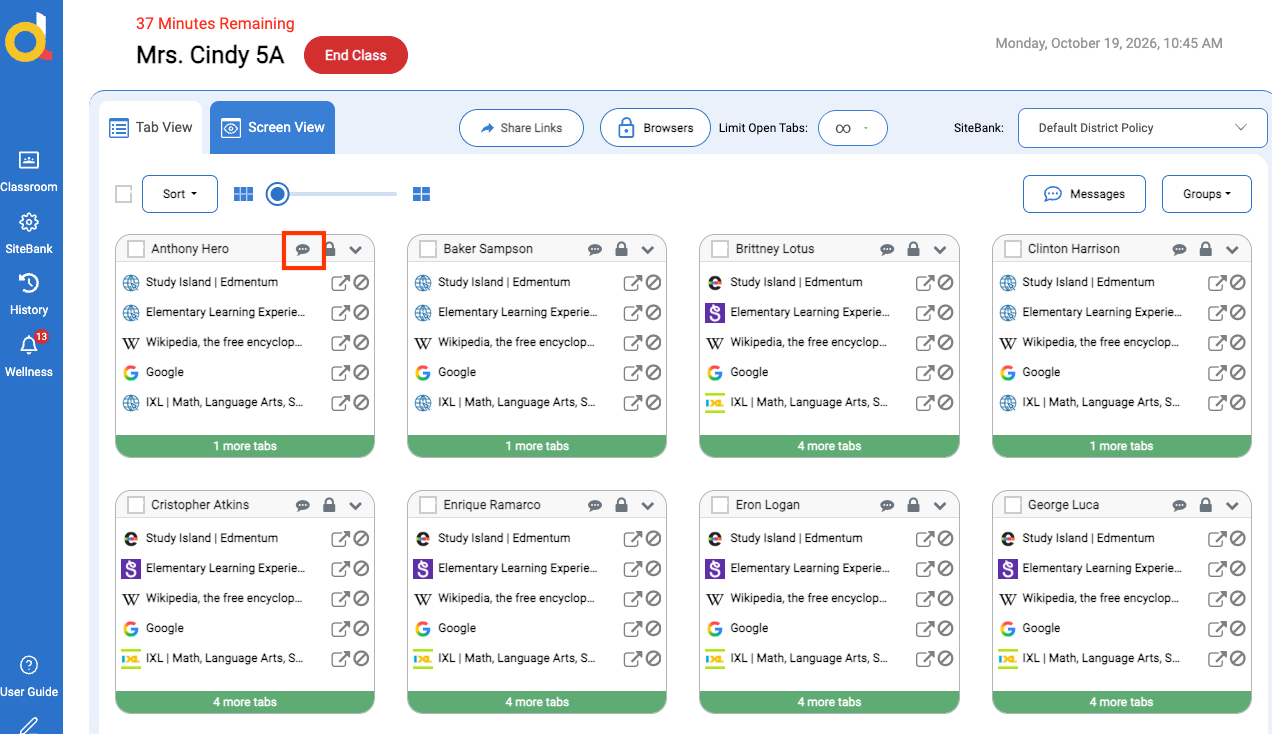
To send a message:
- Select the message icon on a student card.
- Enter your message.
- Send the message.
Students can respond to teacher messages, allowing for direct communication during class if 2-way messaging has been enabled by your administrator.
Message history may be available for review after class if message logging has been enabled by your administrator.
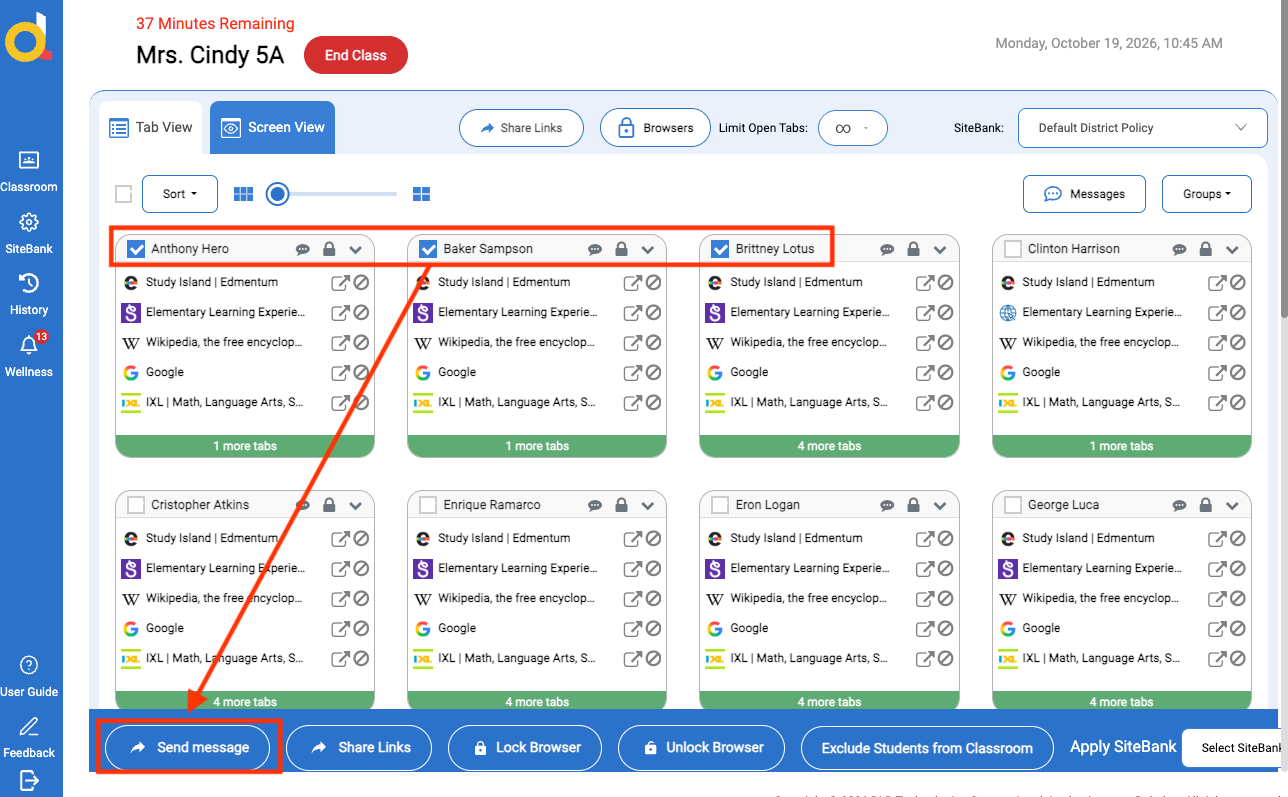
Send a Message to the Multiple Students
Teachers can also communicate with multiple students or the entire class. Messages can include emojis.
- Send announcements
- Share reminders
To select mulitple students to message at the same time, click on the check box for those students and select Send Message.
Take Screenshots
Teachers can capture screenshots of student activity for documentation purposes.
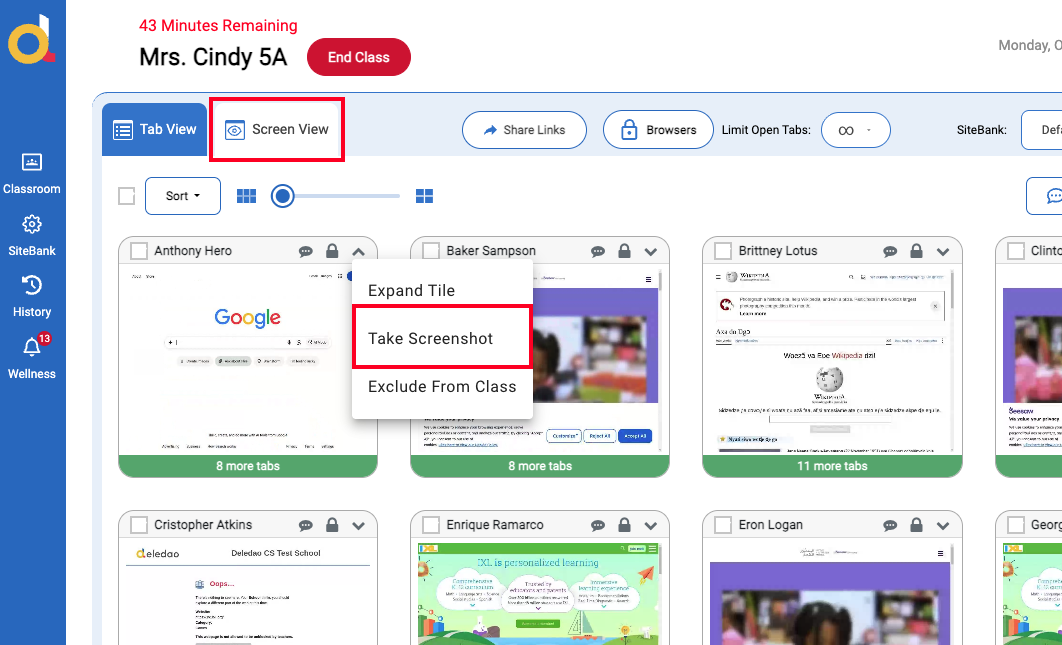
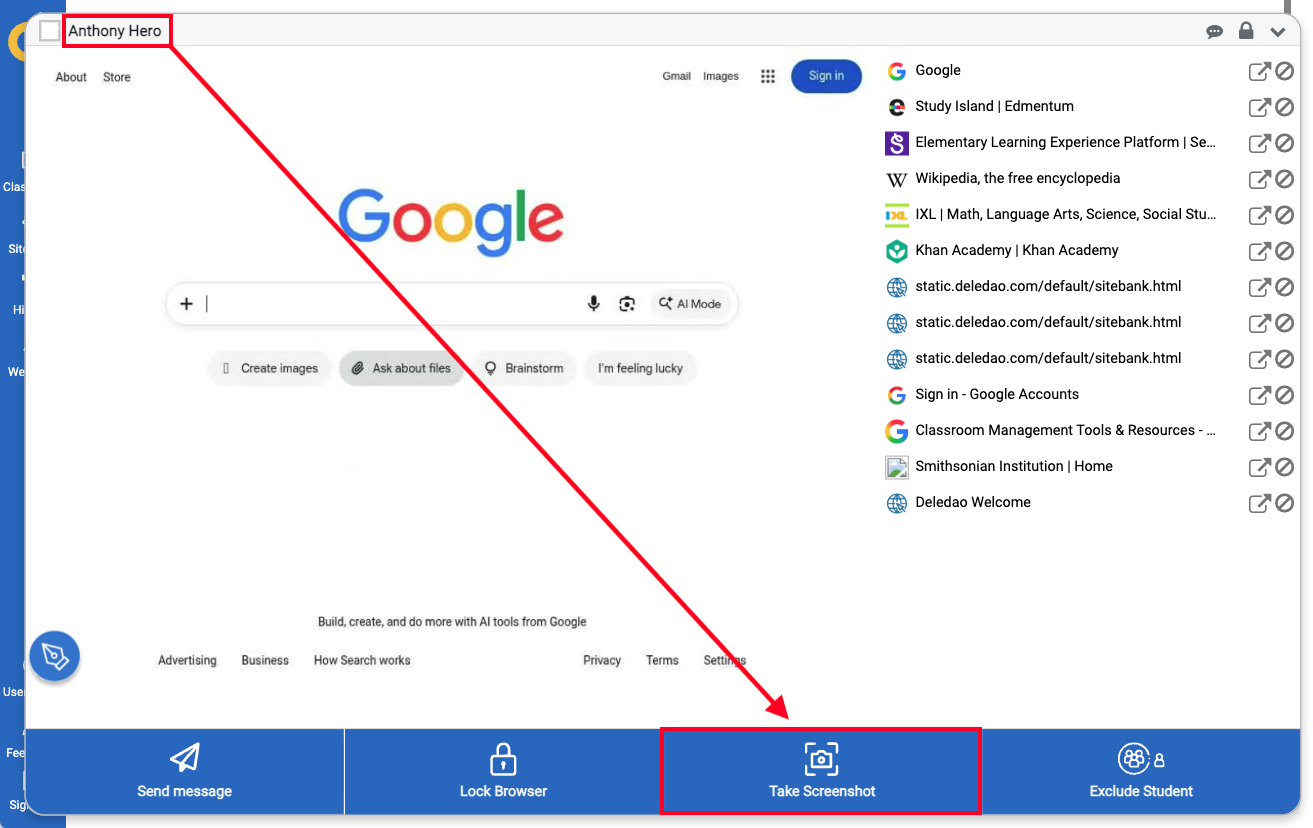
To take a screenshot of an individual student card:
- Go to Screen View tab or click on the student name to have a full screen view of the student card.
- Select drop down menu on the student card.
- Select Take Screenshot.
- Verify the screenshot confirmation message.
Screenshots are stored in History under Classroom Screenshots.
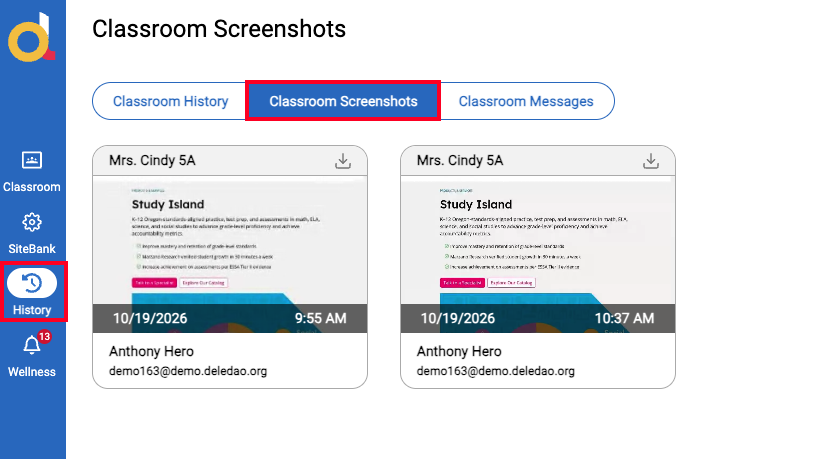
Screenshots are retained for 30 days before being automatically removed.
Lock Browsers
ActiveInstruct allows teachers to temporarily lock browsers during instruction.
Lock an Individual Browser
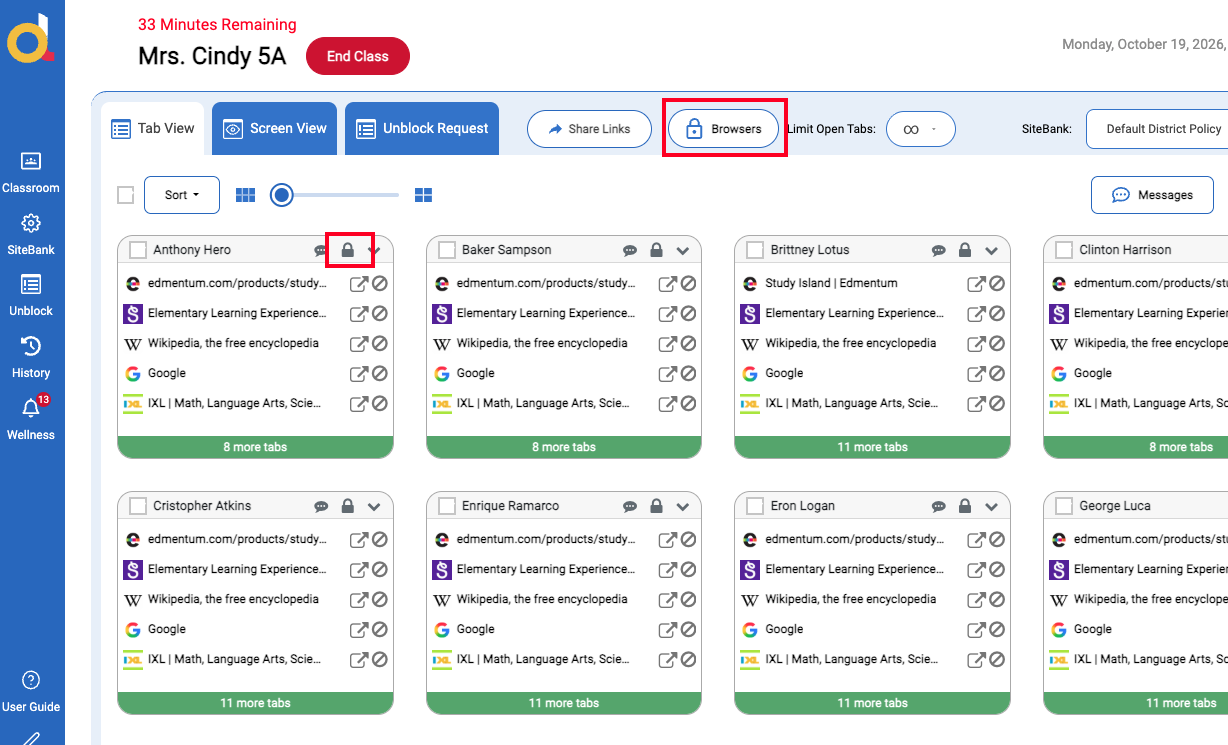
Select Lock icon from the student's card.
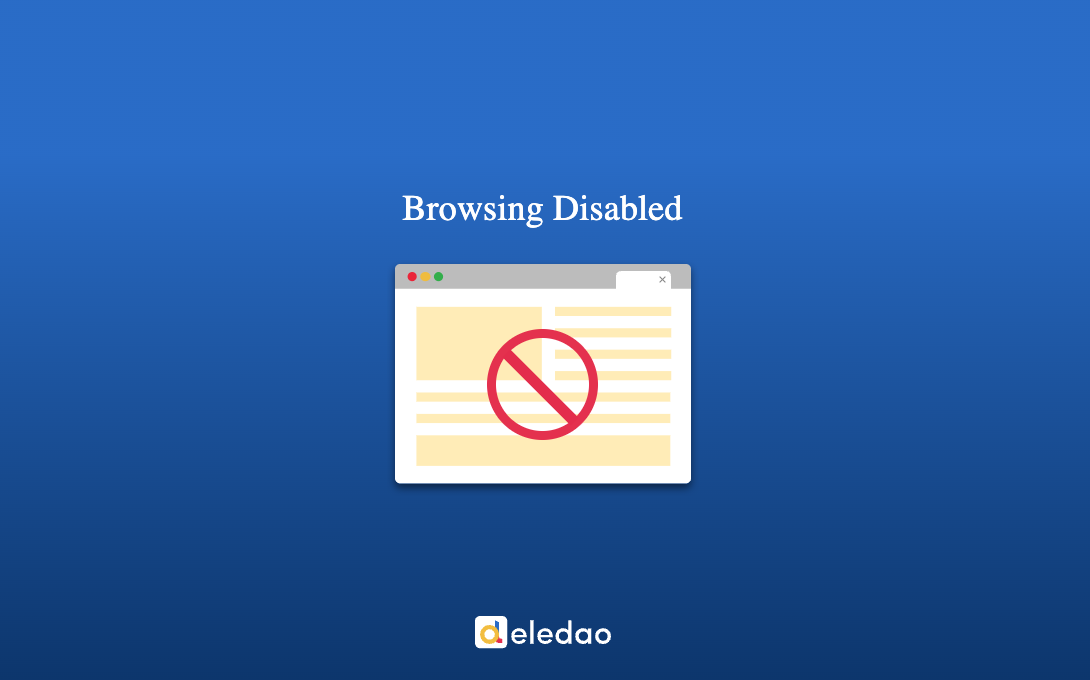
The student will see a browser lock screen until the lock is removed.
Lock All Browsers
Select Lock Browsers button to lock every student's browser simultaneously.
This feature is useful when:
- Giving verbal instructions
- Leading classroom discussions
- Conducting demonstrations
- Redirecting student attention
When unlocked, students return to their previous work. The lock does not close tabs or remove browsing activity.
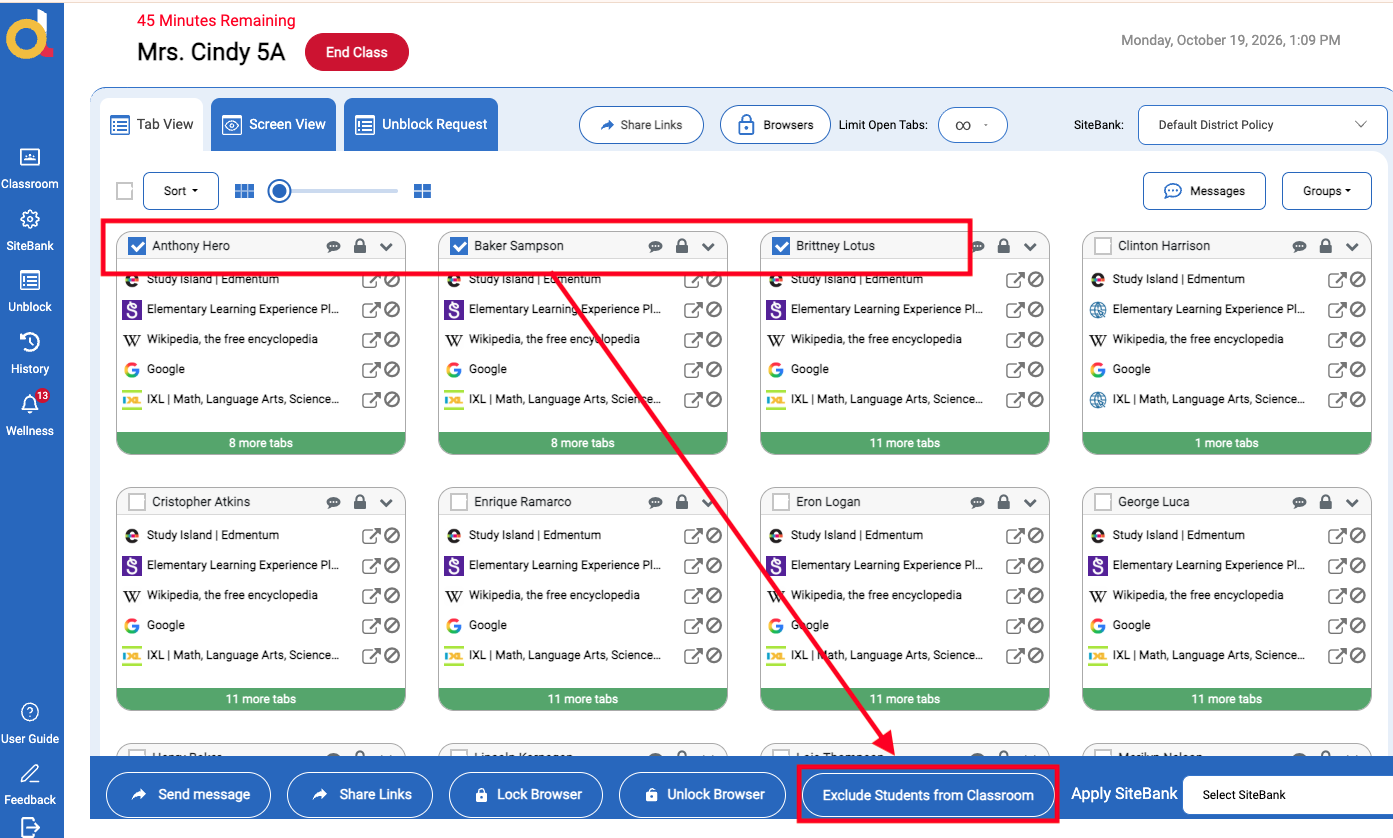
Exclude Students from a Class
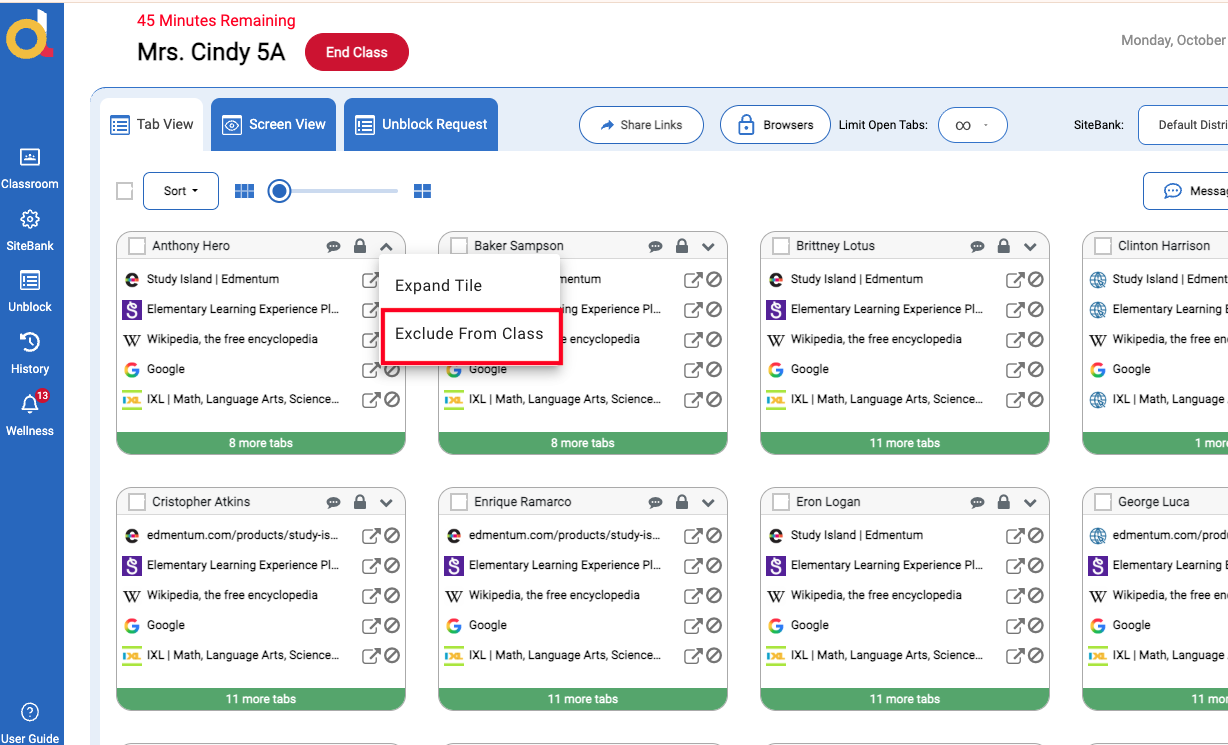
Teachers can temporarily remove a student from an active classroom session.
Excluding a student:
- Removes classroom restrictions for that student
- Does not remove the student from the classroom roster
- Allows the student to be re-added later
This feature can be useful when a student leaves class for counseling, special services, appointments, or other activities.
Manage Browser Tabs
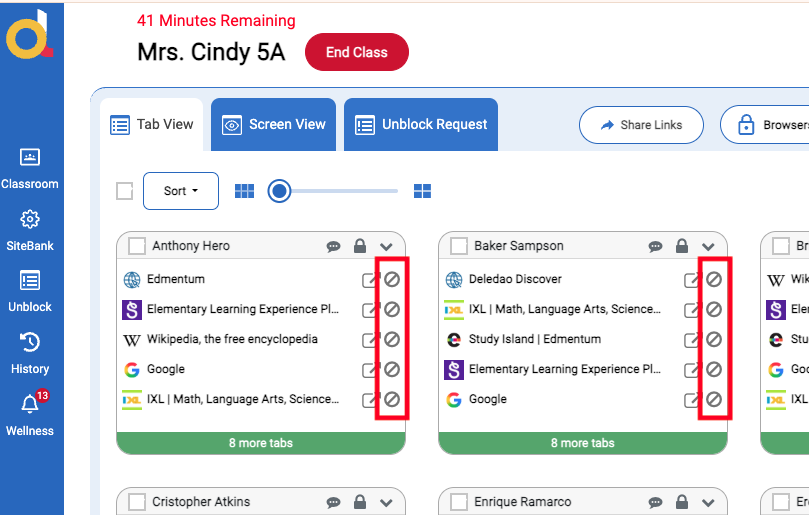
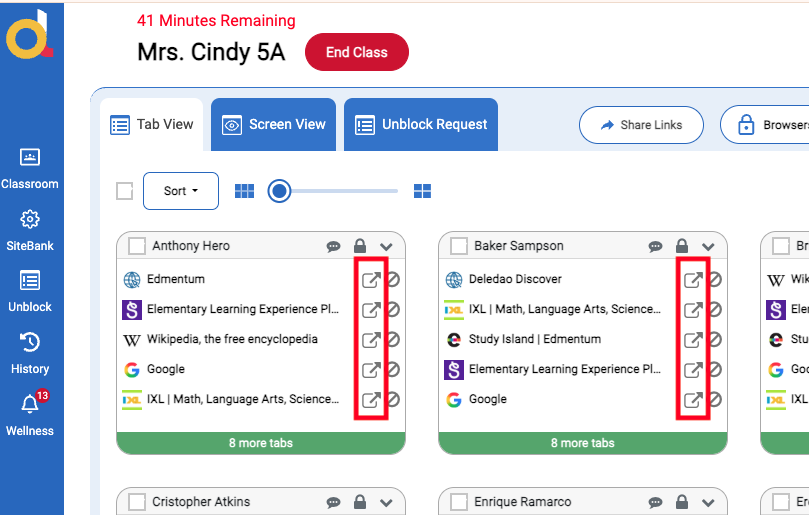
Teachers can manage student browser tabs during a Live Classroom session.
Close Tabs
Teachers can remotely close tabs from a student's device.
This can help redirect student attention and reduce distractions.
Open Student Tabs
Teachers can open a student's active tab in their own browser.
This allows teachers to review the content being viewed without needing to physically access the student's device.
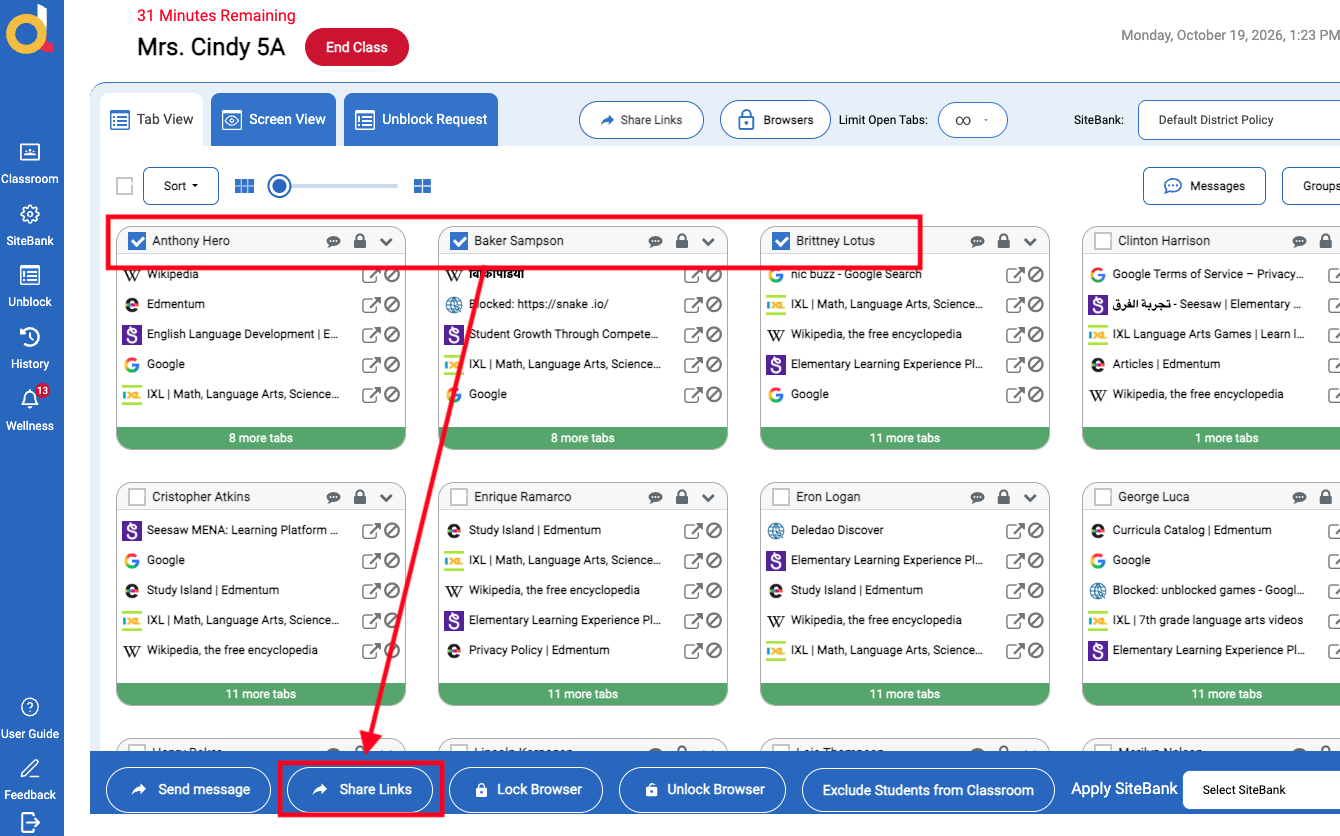
Share Links with Students
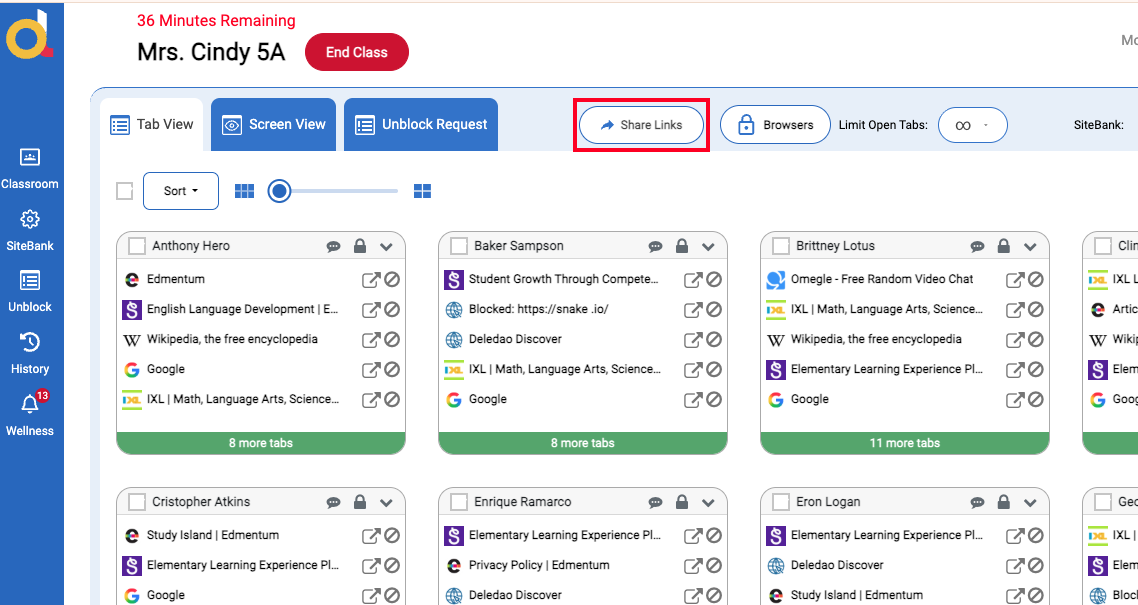
Teachers can share websites with students during instruction. By default, shared links are subject to the web filtering policies configured by the administrator.
Using Share Links, teachers can push a webpage directly to student devices.
This is especially useful when introducing new resources or directing students to instructional content.
Share Links with Proactive Unblock
Prerequisite: Proactive Unblock must be enabled by your administrator.
Proactive Unblock allows teachers to temporarily provide access to a resource that would normally be blocked by a student's filtering policy.
This feature is particularly useful when a blocked resource supports a legitimate instructional activity.
How Proactive Unblock Works
During a Live Classroom session:
- The teacher locates a website that supports classroom instruction.
- The teacher uses the Share Links feature to send the website to students.
- The website becomes temporarily accessible for students participating in that Live Classroom session.
- When the Live Classroom session ends, access to the website automatically returns to the student's normal filtering policy.
Example: Classroom Discussion
A teacher is leading a discussion about the health risks of vaping.
A student discovers an article that would normally be blocked because it falls into a restricted content category.
After reviewing the article, the teacher determines that it is educationally appropriate and relevant to the lesson.
The teacher shares the article using Share Links, making it available to students for the duration of the Live Classroom session.
When class ends, the article is no longer accessible unless permitted by the student's normal filtering policy.
Benefits of Proactive Unblock
- Supports instructional flexibility
- Provides temporary access only when needed
- Eliminates unnecessary unblock requests during class
- Allows teachers to respond quickly to teachable moments
Important: Proactive Unblock does not permanently change filtering policies. Access is limited to the active Live Classroom session and automatically expires when the session ends.
Classroom Alerts
Live Classroom provides visual alerts that help teachers identify important student activity.
Alerts appear on student cards during a classroom session.
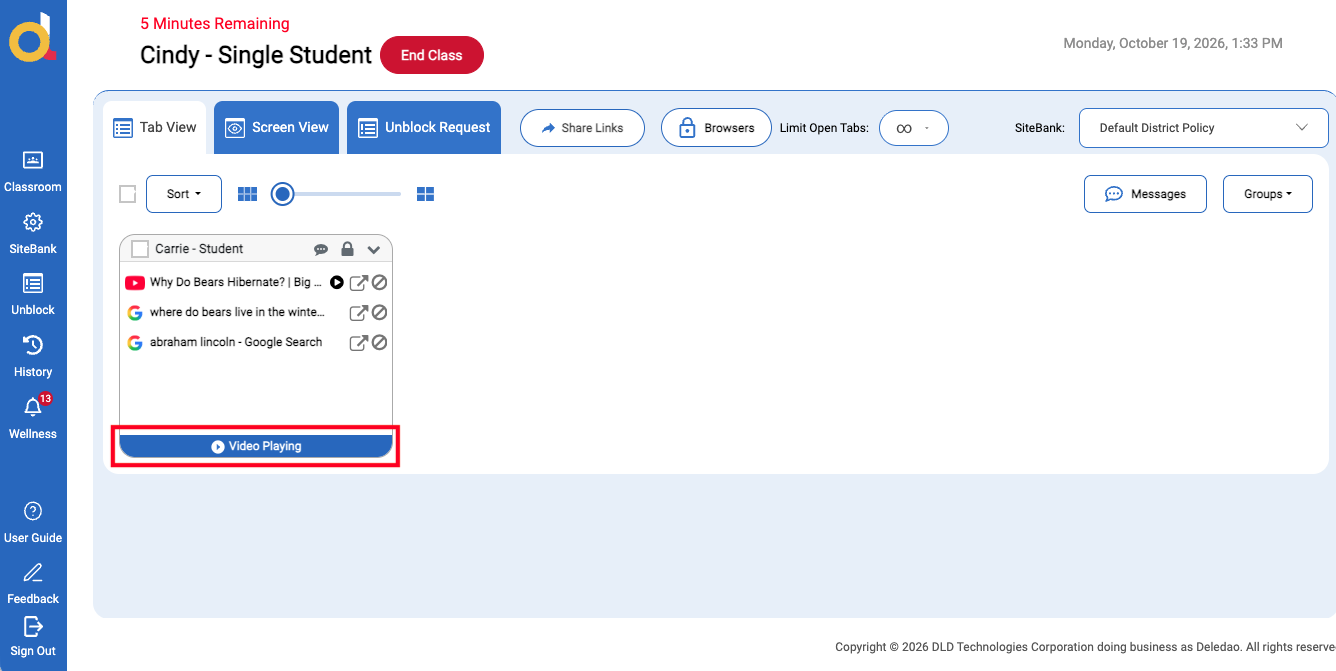
Audio and Video Detection
Indicates when audio or video is actively playing on a student's device.
Teachers can select the alert to review the content being played.
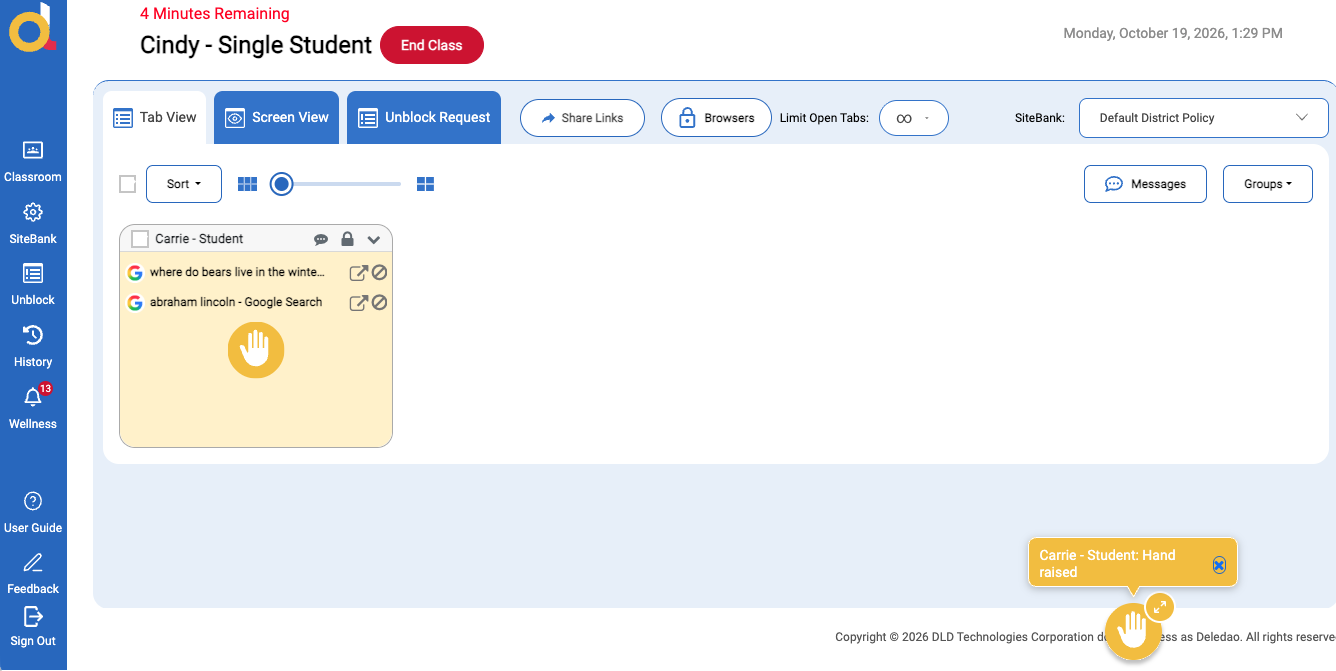
Raised Hand
Appears when a student requests assistance.
Students can raise their hand using the Deledao browser extension.
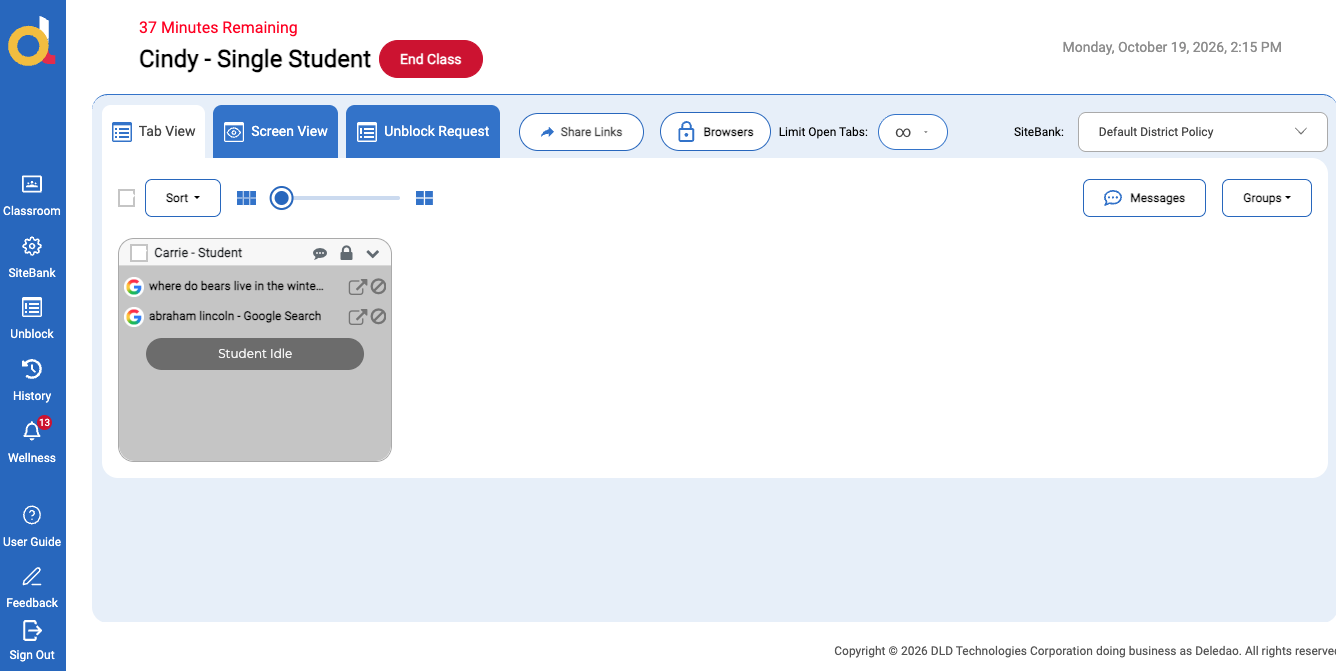
Idle Alert
An idle indicator appears when a student is inactive.
This helps teachers identify students who may need assistance or redirection.
Student Communication Tools in Microsoft Environments
Students using Microsoft Edge with Deledao's Local Proxy can access classroom communication tools directly from a Deledao icon displayed in the browser.
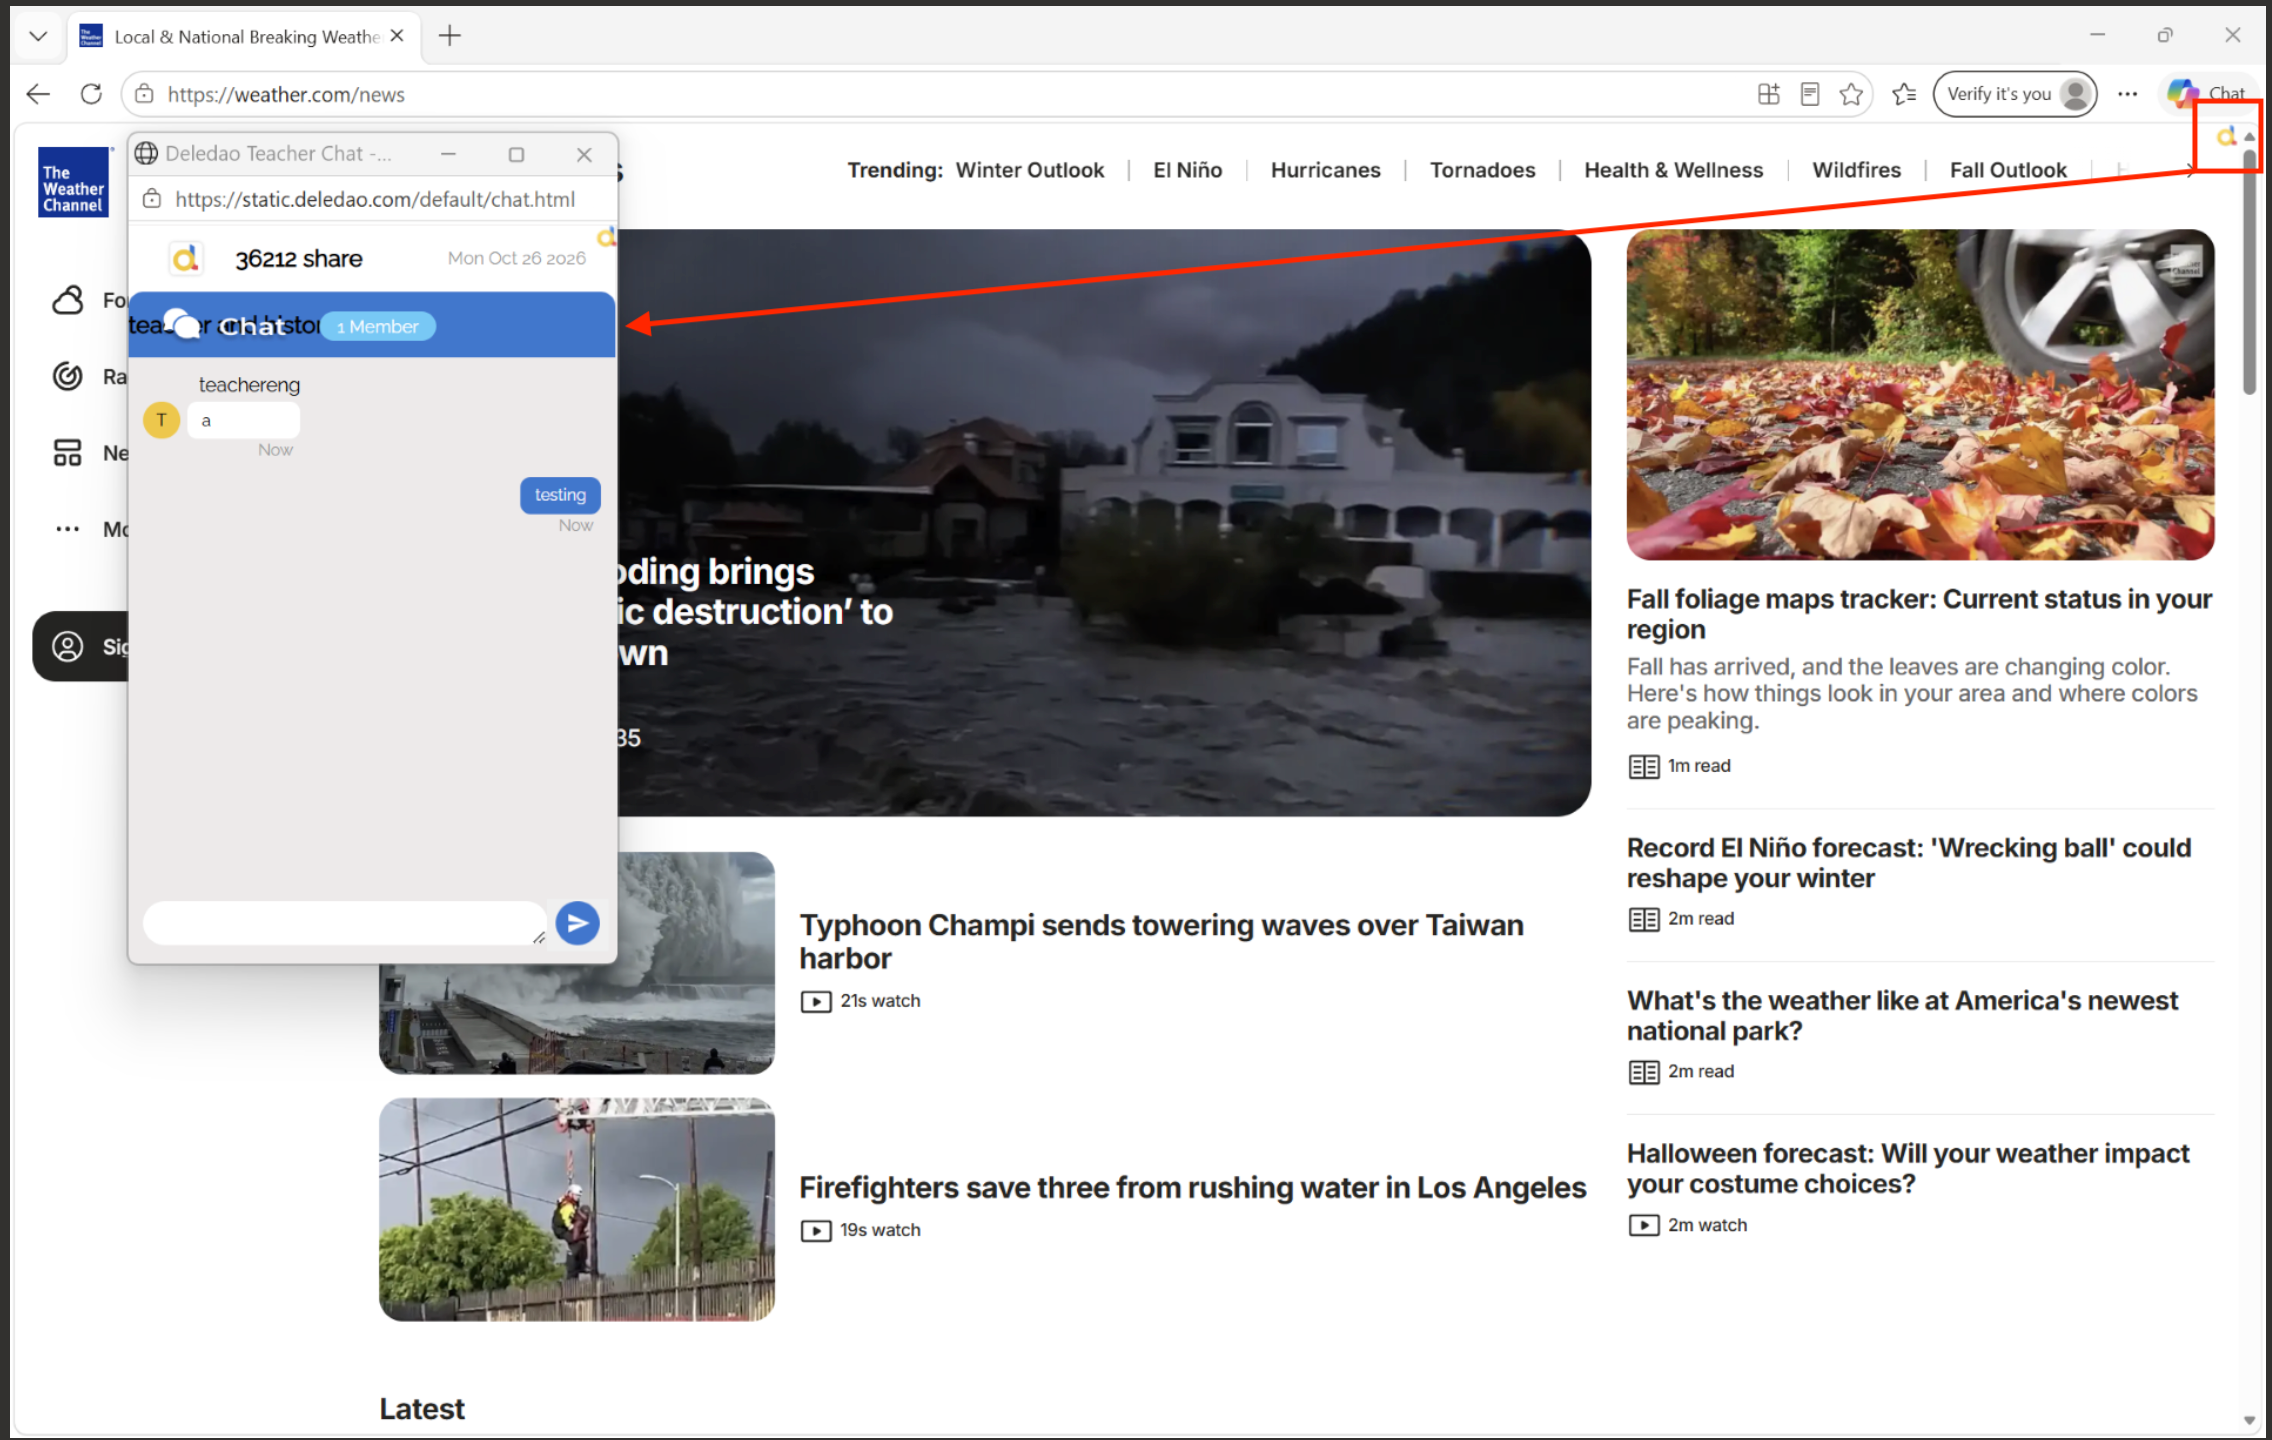
Through this menu, students can:
- Raise their hand to request assistance
- Send messages to the teacher during an ActiveInstruct session
When a student raises a hand, teachers receive a notification within ActiveInstruct, making it easy to identify students who need help without disrupting the class.
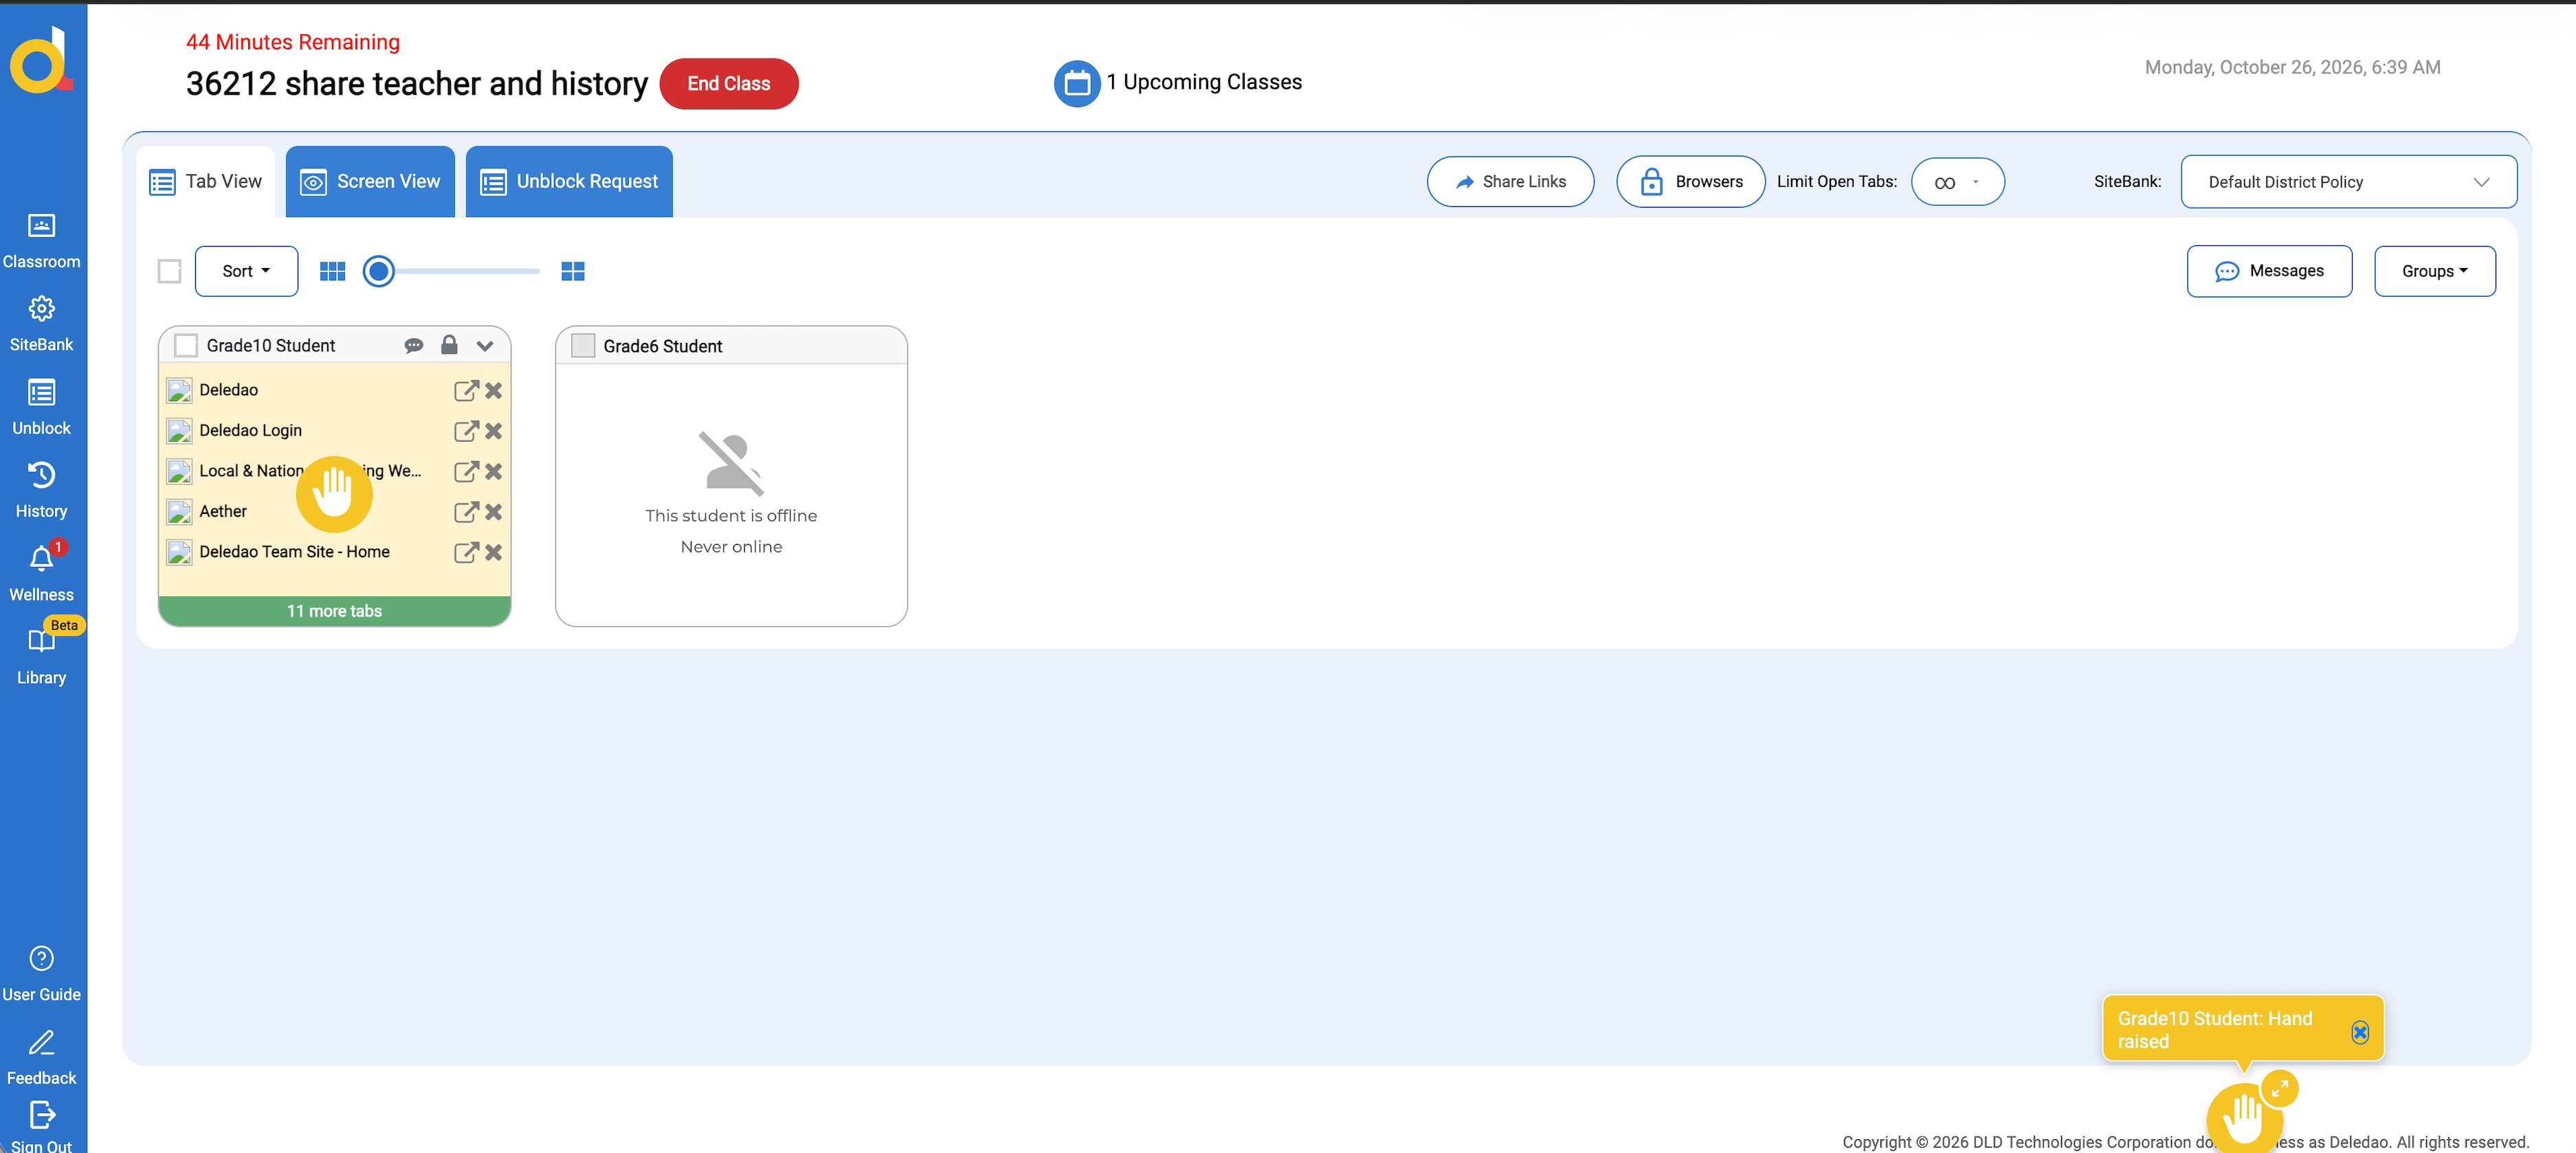
Note: This functionality provides the same classroom communication capabilities available through the Deledao Chrome extension in Google Workspace environments. It is automatically available for students using Microsoft Edge with Deledao's Local Proxy deployed.
What's Next?
Now that you understand the tools available during a Live Classroom session, continue to:
- Using SiteBanks to Guide Learning to learn how to focus students on instructional resources.
- Using Groups for Differentiated Instruction to organize students into instructional groups.
- Co-Teaching and Shared Classrooms to learn how multiple educators can collaborate within ActiveInstruct.
- Classroom History and Activity Reports to review reports, screenshots, message history, and student activity after class.
© Deledao Education